Contributing — map an airport¶
Watch it done — video tutorials
XPGuard detects stop bars automatically at every airport. So you never map from scratch. You fine-tune what is already there:
- Nudge a bar that sits off the hold line.
- Aim one that faces the wrong way.
- Add one that is missing.
- Remove one that isn't really there.
A few things to know before you start:
- Submit an empty map to declare that an airport has no stop bars. That clears out false detections.
- Every submission is checked by a reviewer — an admin or a country moderator. Once approved, it becomes the published map for everyone.
- You map stop bars, plus optionally lead-on lines and REL rows. THL needs no contribution. It is worked out from the runway geometry.
Submitting never changes the live map
A submit creates a separate proposal. Nothing in any sim changes until a reviewer approves it.
First — which scenery are you flying?¶
XPGuard keeps a separate map per scenery. An add-on paints its markings in slightly different places than the built-in airport. A map made for one will not line up on the other.
| Map | What it is | How to edit it |
|---|---|---|
| Base map | The airport's default map, authored in the web editor on X-Plane's official airport layout data (the Gateway). Controllers use it; X-Plane's built-in scenery gets it; every unmapped scenery falls back to it. | The dashboard (Option B), or in-sim in X-Plane. |
| MSFS · Stock | MSFS's built-in airport is not the Base map — its markings sit differently, so it gets its own variant map. | In-sim, from MSFS 2020 or 2024. Both share the built-in ground layout, so one map serves both. |
| Add-on · 3rd-party | A payware or freeware airport you installed — an Aerosoft or iniBuilds scenery, for example. Its markings sit differently, so it gets its own map, tied to that exact scenery. Only pilots on the same add-on receive it. | Only from inside the sim (Option A), where XPGuard can see what is loaded. |
Rule of thumb
- Built-in airport — edit the Base map from the dashboard. (In X-Plane,
in-sim works too. In MSFS you can map the stock airport as
MSFS · Stock.) - Add-on airport — always use in-sim contribution mode. It is the only way XPGuard can attach your map to the right scenery.
Editing the Base map is never wasted
Until an add-on has its own map, everyone flying it falls back to the Base map. It is the baseline every scenery starts from. A cleaner Base map helps add-on flyers too, right up until somebody maps that add-on.
On the radar, controllers always use the Base map. One set of bars per
airport, switched by the bar's name, with that state shared across every scenery.
So a controller never needs to know which add-on you fly. They light bar C1,
and every pilot sees C1 turn red — each at the spot that matches their own
scenery.
Option A — in the sim (contribution mode)¶
Contribution mode pairs a browser editor with your running sim (figure below). Edits show live in the sim, so you align against the real 3D world.
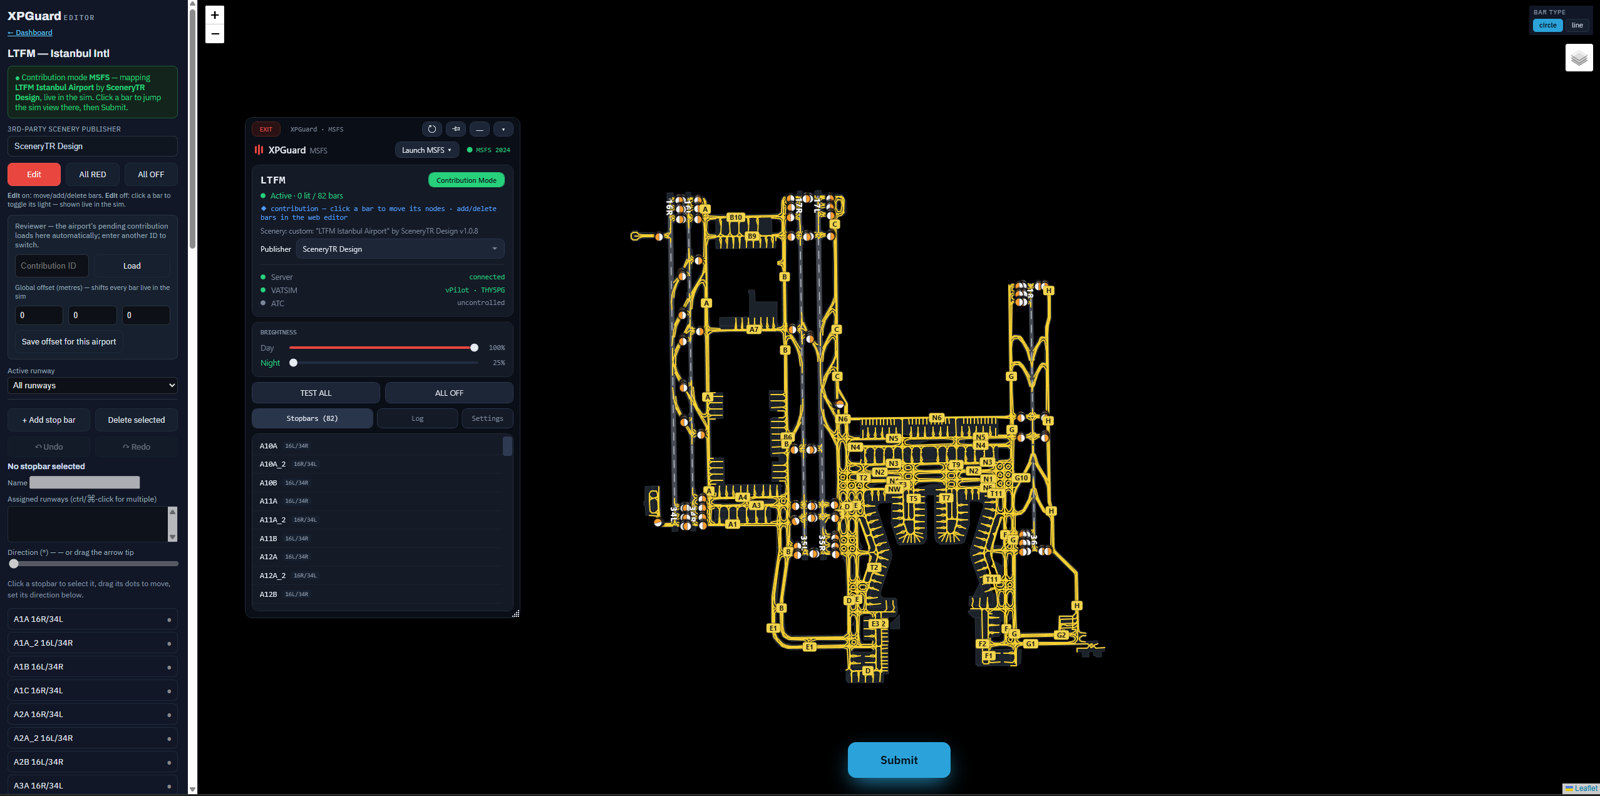
- Works in X-Plane and MSFS.
- The only way to map an add-on.
Start it from the pilot plugin:
- X-Plane — click
Stop bar + RELunder Contribution mode. - MSFS —
Contribution Mode ▾→BAR · LEAD-ON · REL.
MSFS moves your aircraft
In MSFS, contribution mode teleports your aircraft to each bar you inspect. It cannot fly a free camera the way X-Plane does. The plane will jump around the airport — that is expected.
- Do it parked on the ground, not mid-flight.
- Leaving contribution mode returns you to normal.
- X-Plane flies an external camera instead and never moves the plane.
MSFS only — prompts follow:
- A warning that contribution mode moves your aircraft — click
OK. - A
Which scenery?dialog — only when it is genuinely ambiguous: several add-ons cover the airport, or the loaded one is not the Publisher picked in the app. Pick the add-on you are mapping and clickContinue. One matching add-on is chosen for you without asking. The built-in airport needs no pick either — it is mapped asMSFS · Stock, on 2020 and 2024 alike.
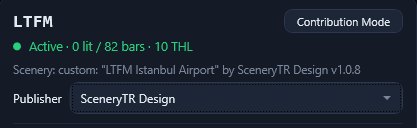
The plugin then opens the editor in your browser. It tells the editor whether you are on the built-in airport or an add-on, so your map is filed correctly.
Then, in the editor:
- Every change mirrors into the sim within a second or two.
All RED/All OFFflash the lights, so you can confirm the bars sit right. -
Jump to a bar — it works both ways:
- Click a bar in the editor → the sim goes to it. X-Plane flies the camera. MSFS teleports you ~15 m in front, facing it.
- Click a bar in the app's Stopbars list → the editor map zooms to it.
Either way, that bar becomes the one the keyboard nudges. - Click
Submitwhen done. Contribution mode ends and the plugin returns to the live map.
Nudging a bar's shape from the sim¶
You never have to leave the 3D view to line a bar up.
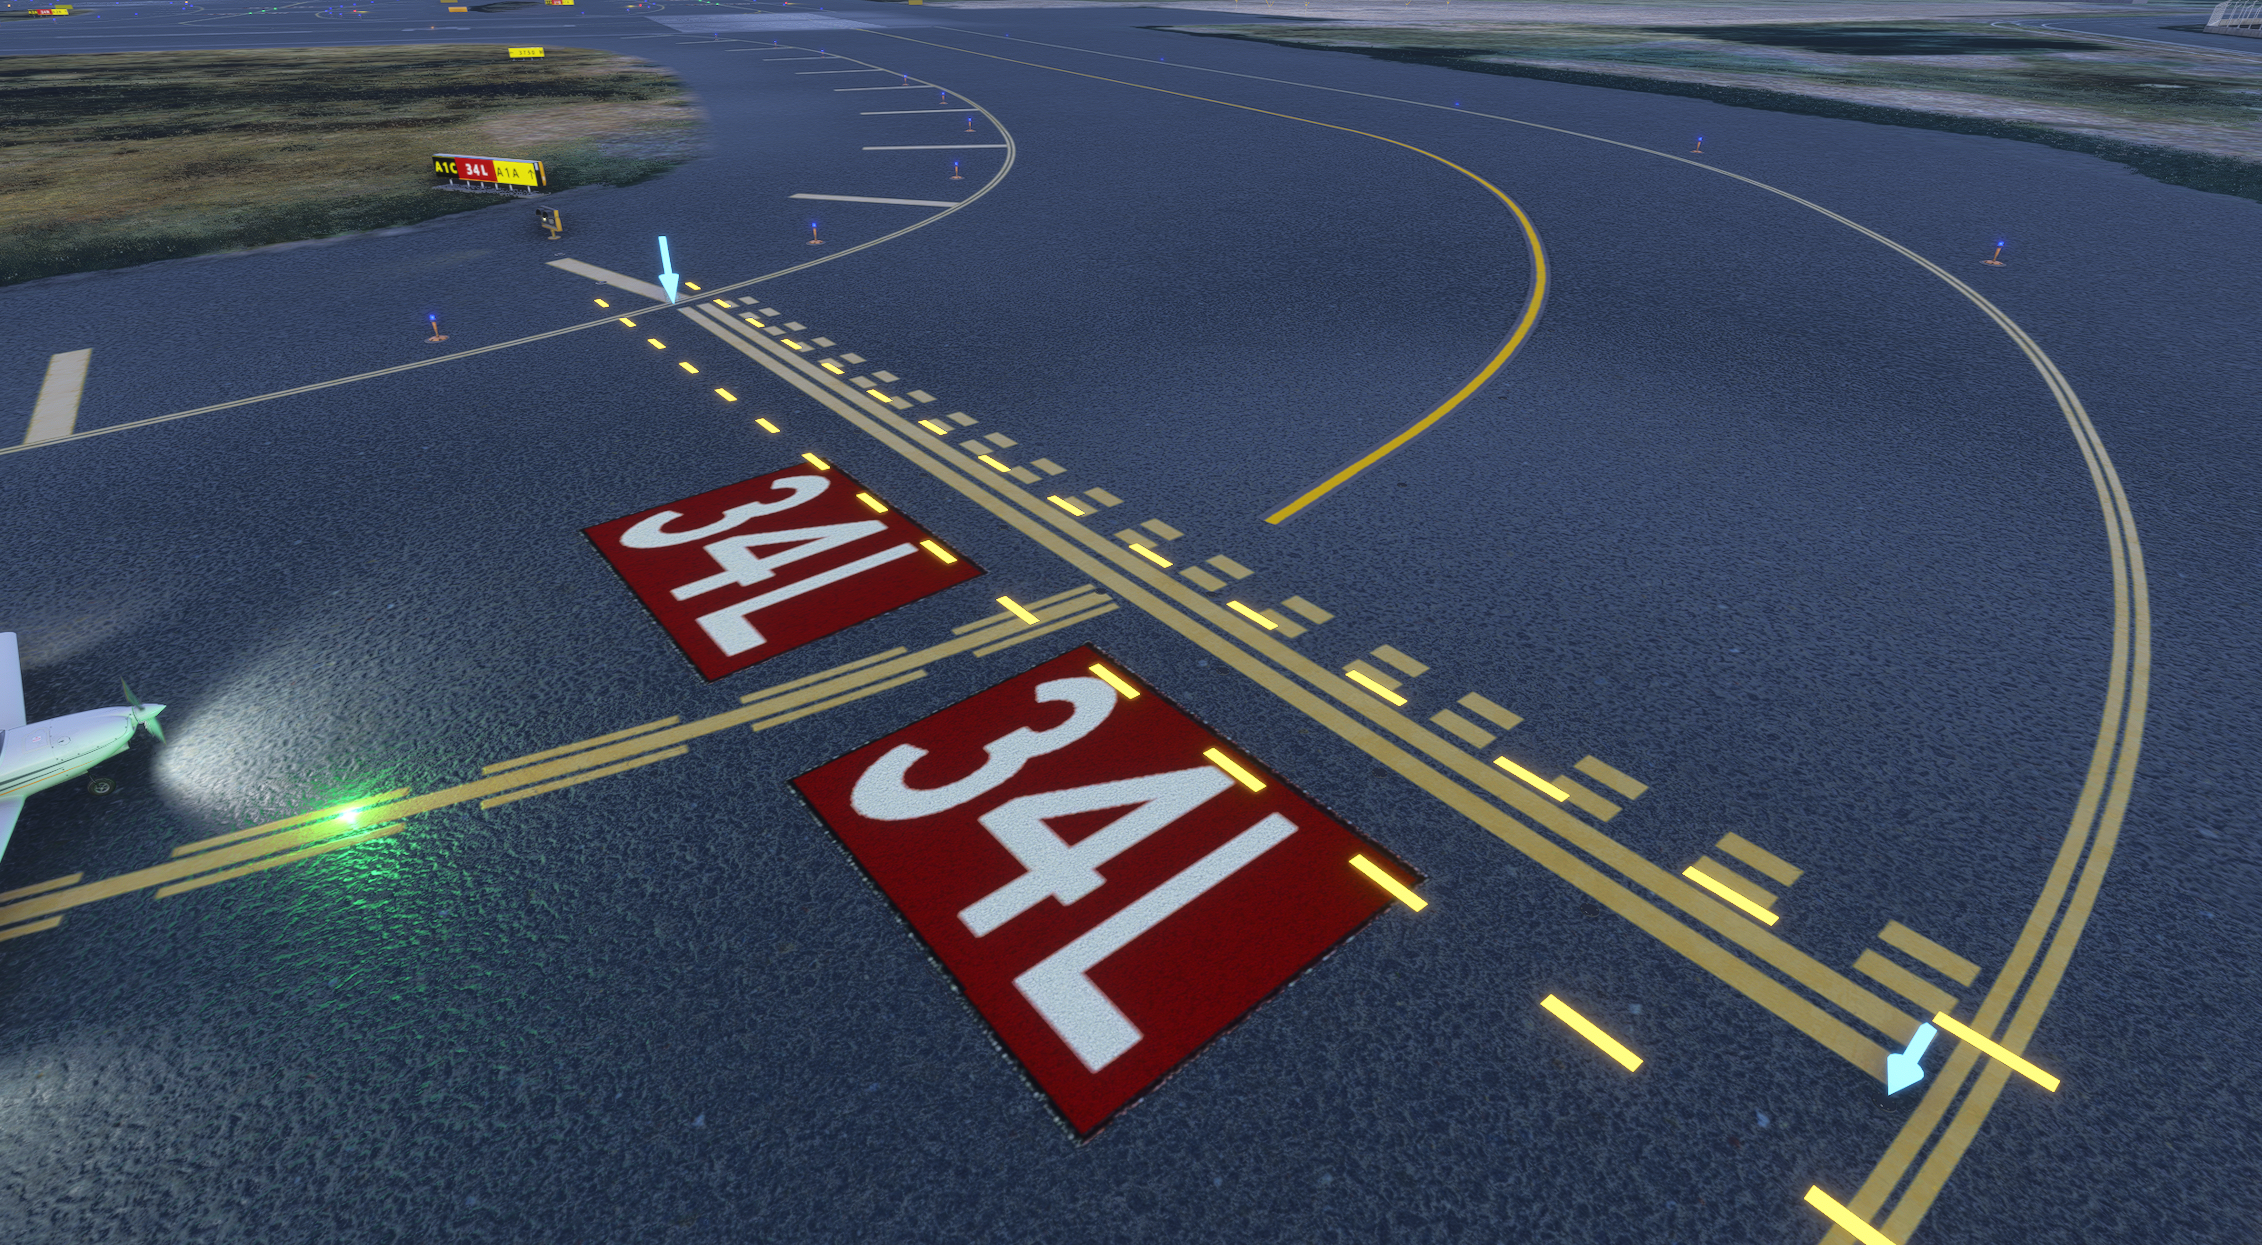
- A small blue arrow marks every node — the points that define a bar's shape.
- Select a bar. Its selected node grows into a bigger arrow (figure below).
- Walk that node into place with the keyboard while you watch the real markings.
| Action | X-Plane | MSFS (works even while the sim has focus) |
|---|---|---|
| Move the node 0.5 m (Up/Down along the runway, Left/Right along the bar) | ↑ ↓ ← → |
Ctrl+Shift+↑ ↓ ← → |
| Jump to the next node | Tab |
Ctrl+Shift+N |
Each nudge moves the bar live and saves to the editor. So browser and submission stay in sync. Add or remove whole bars in the browser — the sim is for fine-positioning.
Option B — from the dashboard (browser only)¶
No sim needed. This edits the Base map only.
- Open your dashboard → Contributions.
- Under Find an airport, search by ICAO or name — optionally narrowing by country — and click it. The card shows coverage and full edit history.
- Click
Open in editor →. - Make your corrections and click
Submit.
Add-on scenery?
The dashboard editor only edits the Base map. To map an installed add-on — or
the MSFS stock airport as MSFS · Stock — use in-sim
contribution mode (Option A), so XPGuard
can detect it.
Editing the bars¶
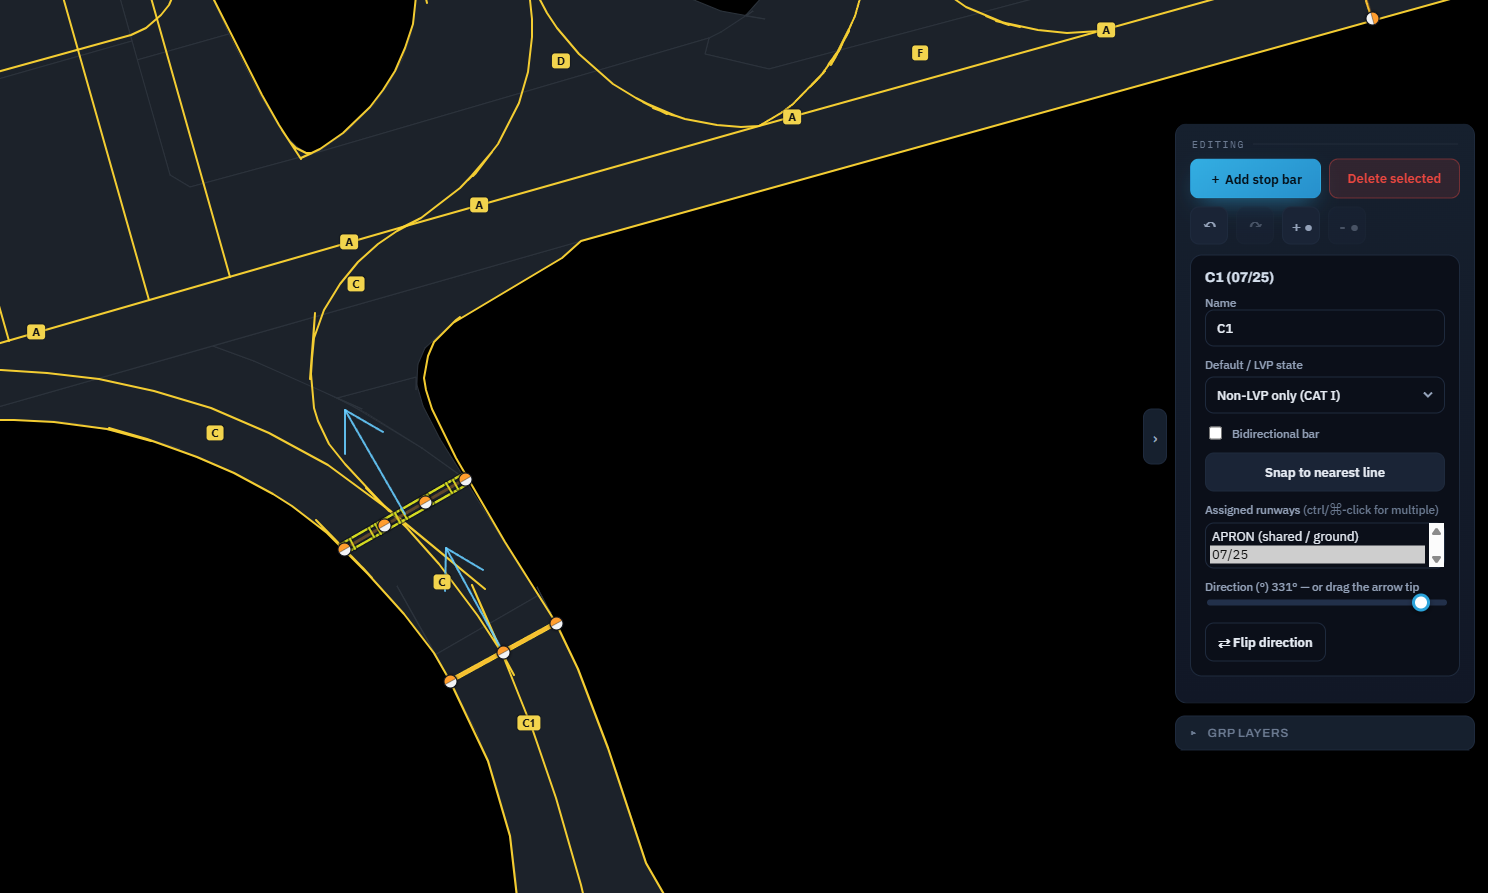
Both routes open the same editor: a map of the airport with the auto-detected bars already drawn (figure below).
The tools¶
- Move / reshape — click a bar, drag its dots. In contribution mode you can also nudge nodes from the sim.
- Aim it — drag the cyan arrow, or use the
Directionslider. It points the way the bar shines: perpendicular to the taxiway, toward the runway. - Name & runways — name the bar and assign one or more runways (Ctrl/Cmd-click
for several). Not at a runway hold-short? Pick
APRONinstead — apron bars are switched by the ground controllers, shared between positions. The picker showsAUTOorPINNED:AUTOmeans the nearest centerline decided the runway and nobody confirmed it. After moving a bar, check the runway. Picking one yourself pins it. - Add —
+ Add stop bar, click points,Ctrl+Clickto finish.Ctrl+Right-clickremoves the last point.Esccancels. - Delete — select a bar, click
Delete selected. - Undo / redo —
↶/↷, orCtrl+ZandCtrl+Y. Up to 100 steps. +●/-●— insert a node in the selected bar's longest segment (max 64), or delete the selected node. On a two-node bar that deletes the bar, so it asks first.- Auto light spacing — on, the lights are spaced along the bar for you. Untick it
to set
# of lights: one light lands on each end, the rest spread evenly. - Snap to nearest line — fits the bar onto the nearest X-Plane painted line running the same way (each node within 15 m, bearing within 20°). X-Plane data only, so not in MSFS contribution mode.
⇄ Flip direction— flip the direction the bar faces. On a bent bar with multiple nodes, every segment flips.- View filters —
Active runwayandDefault / LVP statenarrow which bars are drawn, so you can work one runway at a time. They change the view only, never what you submit. - Save draft — keep unfinished work privately and continue later from your dashboard. A paired session resumes from your saved draft, with a link to discard it and start from the published map.
- Submit — opens a dialog asking you to summarise the changes (e.g. "Fixed the C3 bar direction, removed a false bar at A1"). That note reaches the reviewer, so a clear one speeds approval.
Per-bar Default / LVP state¶
Every bar carries a Default / LVP state. Set it from the Default / LVP state
dropdown. It shows in the bar's radar tooltip, and it decides when the bar lights on a
claimed runway:
| State | Behavior |
|---|---|
ON |
A regular bar — lit whenever its runway is claimed, in LVP or out. |
Non-LVP only (CAT I) |
Lit normally, dark while LVP is on. |
LVP only (CAT II/III) |
Dark normally, lit while LVP is on. |
OFF |
Dark in both modes — switched by hand when needed. |
The editor pre-suggests LVP only for a bar drawn on the CAT II/III ladder marking.
The dropdown overrides it. For the full picture see
LVP & per-bar states.
Bidirectional bar¶
Tick Bidirectional bar for a two-way apron or taxiway lane. The lights then
shine both ways in the sim.
- Leave it off for a normal hold-short bar — lights face the holding side only.
- It stays one bar: map, list and the controller's toggle treat both directions as a single stopbar.
No entry (always red)¶
Tick No entry (always red) to mark an exit-only taxiway where entry is
prohibited (ICAO Annex 14 §5.3.24 no-entry bar).
- With state
ON, it is permanently red — in every sim, in LVP and out. - The Default / LVP dropdown can tie it to one mode: an
LVP onlyno-entry bar is pinned red only while LVP is on;Non-LVP onlyis the reverse. In the other mode it is an ordinary, controller-driven bar. - While it is pinned red, controllers cannot toggle it.
OFFcannot be combined with No entry. The server stores that bar as always-red.
Use it only where entry is genuinely forbidden. An ordinary hold-short bar should stay a normal, controller-driven stop bar.
No bars here?
If an airport has no real stop bars, delete them all and submit the empty map. The editor asks you to confirm. Once approved, the false bars are gone for everyone.
Mapping lead-on lines¶
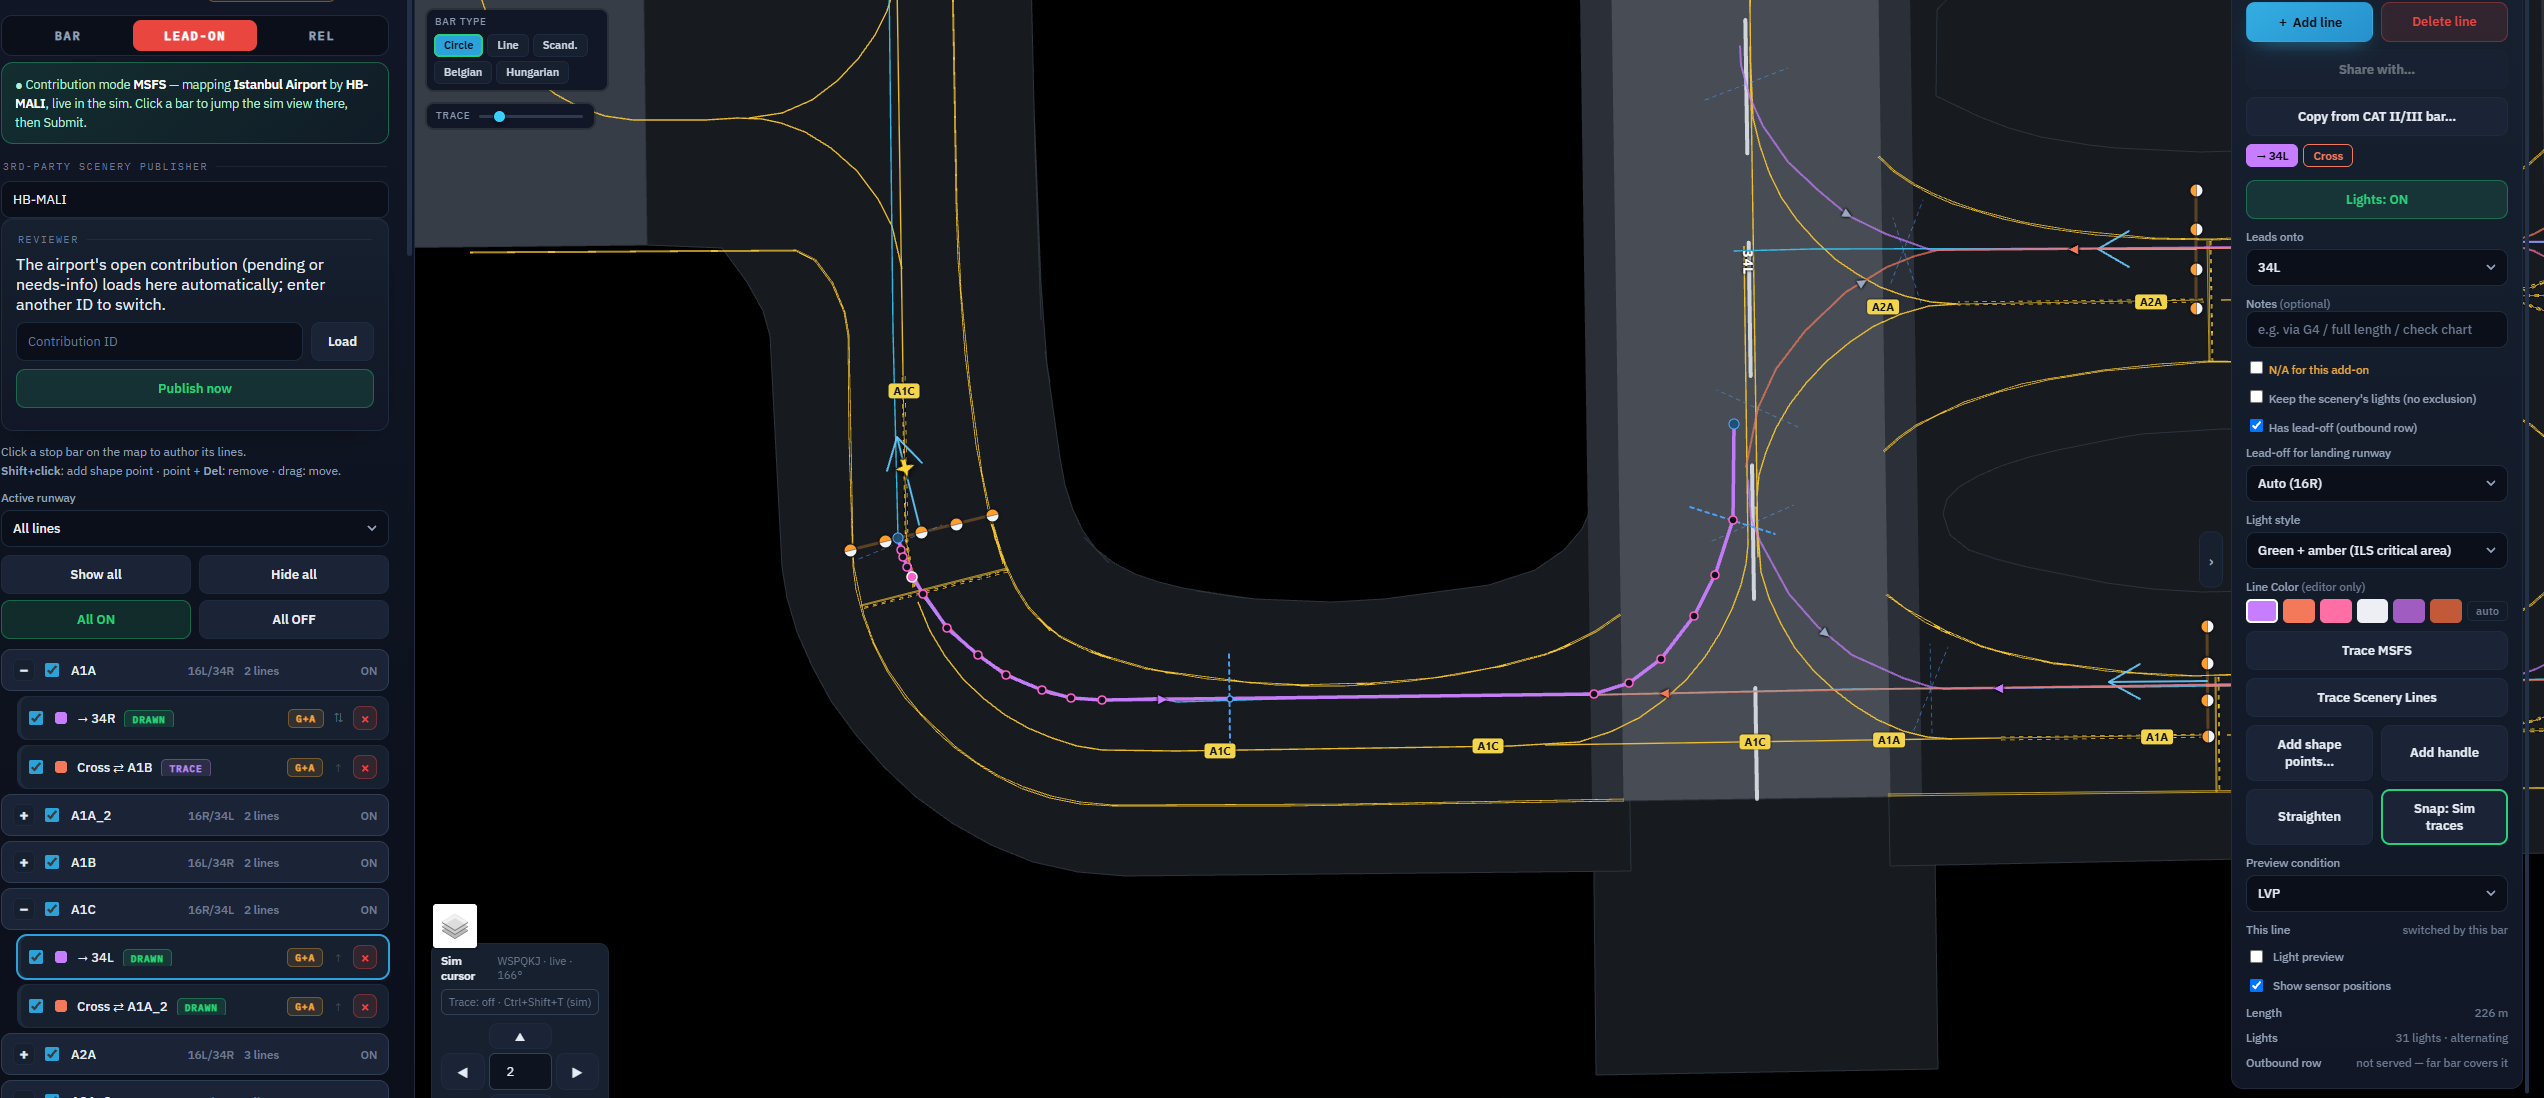
Lead-on lights are the green centerline beyond a stop
bar. They light when a controller clears that bar, for the aircraft that was
cleared. You author them in the same editor, on the Lead-On tab — the
Bar | Lead-On | Rel strip at the top of the sidebar.
Map only what is painted on the ground
If the real airport has no green centerline beyond a bar, do not draw one there.
Drawing lines¶
- Click a stop bar on the map.
- Click
+ Add line. Draw one line per way out of the bar — a bar with a left and a right exit gets two lines. The scope picks by the aircraft's departure runway. - End the line where the scenery's green centerline ends. The lights and the
exclusion follow the line exactly as drawn; the controller's end sensor sits
where the line meets the runway centerline, so lights drawn past it go out when
the aircraft crosses the centerline. A
Crossline goes all the way to the far side.
For each line, set Leads onto:
| Choice | Meaning |
|---|---|
A runway end — 34R, not 16L/34R |
The line leads onto that runway for departure. |
Cross |
The line crosses the runway to the far side. It lights for traffic that is not departing here. |
Exclusion only |
No lights. The line only covers the scenery's own greens on a leg that is not a route — see exclusions. |
Renumbered add-on? Pick the end name your sim shows — publish converts it to the base airport's name automatically.
- Notes — free text, shown in the controller's menu. Use it where two lines out of one bar are not obviously different ("via G4", "full length").
- Default — when two lines lead onto the same end, mark one as default. With none marked, neither lights. The list flags this with a ☆ star.
- N/A for this add-on — on a scenery variant map: the line exists in the real world, but this add-on has no pavement for it. Pilots on it never see the line.
Shaping a line¶
A new line starts straight. Pull it onto the painted centerline:
- Shift+click adds a shape point · Del removes the selected one · drag moves it.
Add shape points…— click along the line to drop points. Fewer is better: two good points beat nine.Add handle— a bezier arm on the selected point. Drag it to bend the curve; the sim lights the same curve.Straighten— back to the straight auto line.Snap— a magnet on dragged and inserted points. Click to cycle the source: off →Sim traces→Scenery lines→X-Planepaint. It starts onSim tracesin a paired MSFS session or where the map has traces, otherwiseScenery lines. One setting, shared with the Rel tab.Trace sim— fit the line to a trace you drove in the sim withCtrl+Shift+T, same as REL tracing. The button readsTrace MSFSorTrace X-Planewhen paired.Trace Scenery Lines— fit it to the lines the map is drawing: the add-on's own lines in a paired MSFS session, X-Plane's paint otherwise.
Lines are shaped in the browser. The sim is for tracing and checking.
Light style — green + amber¶
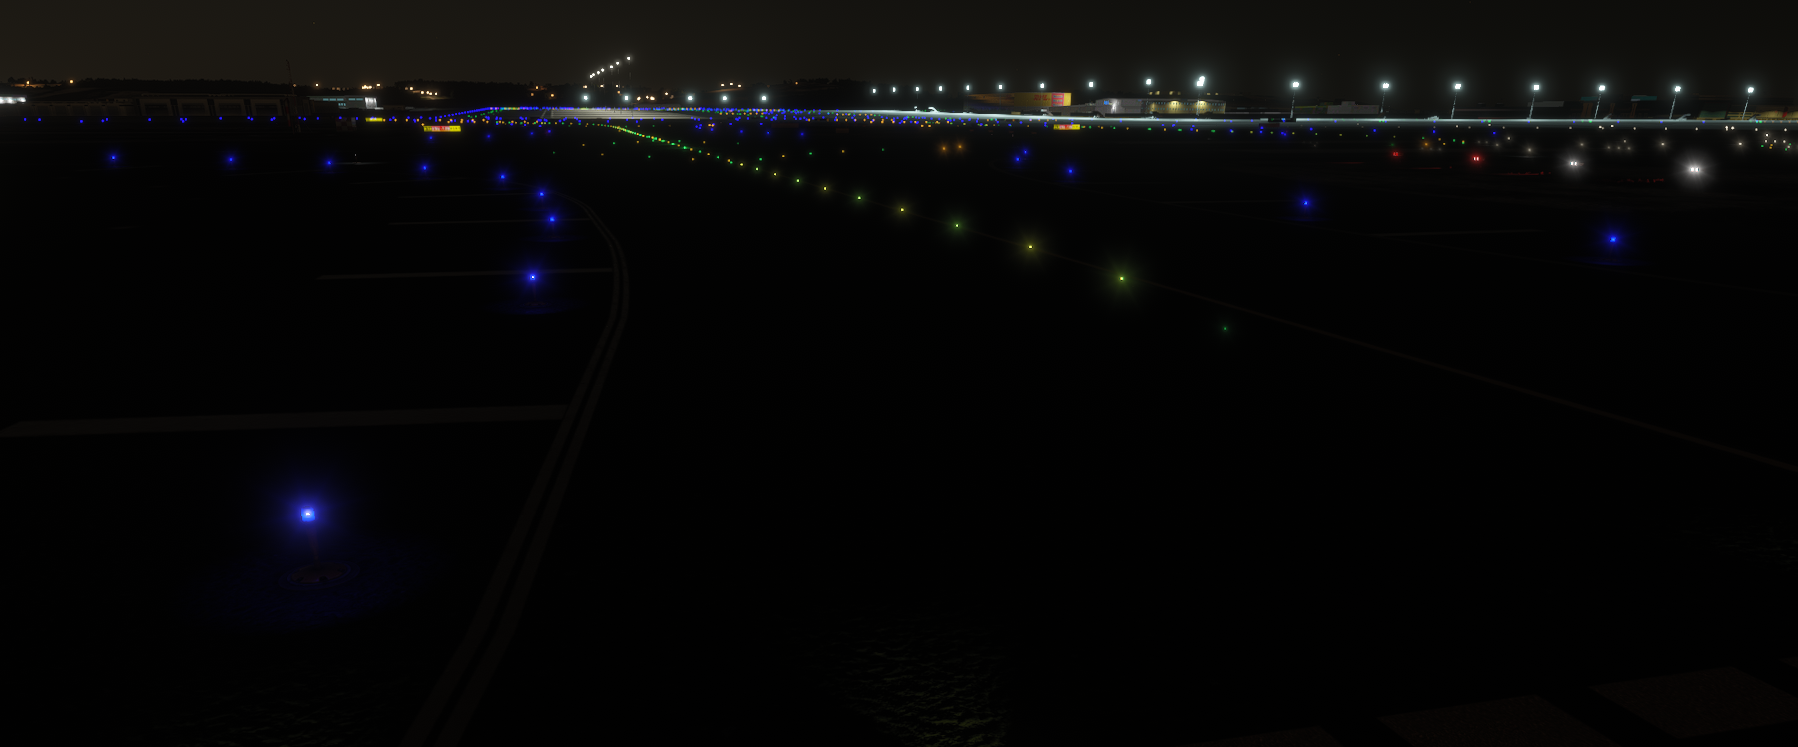
Green + amber (ILS critical area) is the default: the stretch alternates
green/amber, and the first light at the bar stays green. That matches most runway
entrances. Pick plain Green only where the real field has it.
One line, two rows¶
You draw one line; the server serves two. The same lights also burn static green the other way — a lead-off for an aircraft that has just landed and is vacating down the same pavement.
Has lead-offis on by default for runway lines. Untick it where the pavement is one-way.Lead-off for landing runway— leave it onAuto(the opposite end ofLeads onto) unless the exit serves another runway.
Share and copy¶
Share with…— two bars facing each other over the same pavement. Draw one line, share it with the far bar, and each bar switches its own direction. Use it for nearly everyCrossline — otherwise two light rows sit metres apart on one taxiway.Copy from CAT II/III bar…— the CAT I bar's line is the tail of the CAT II/III one. Copy it so the shared stretch keeps the same light positions.
Check it in the sim¶
In a paired session:
All ON/All OFFlight every line;Lights: ON/OFFtoggles the selected one.- Light preview draws the lights at the spacing the server will serve. That row is what the pilot gets — the coloured path is only the editor's handle on it.
- Show sensor positions draws the two marks the scope watches: the end of the first block, and the end of the row.
Copied lines — the VERIFY chip¶
A line copied or synced from another map arrives as a two-point sketch with a
VERIFY chip. The shape belongs to the other scenery, and nothing lights until
you fit it here. Drag a node, add a point, or trace it — the chip clears.
Never keep another map's shape
A line drawn on one scenery sits metres off on another. Trace or drag every
VERIFY line onto the pavement you are mapping before you submit. The same
rule applies to REL rows — a copied row shows VERIFY and gets a fresh
straight line to reshape when you select it.
What gets a lead-on map sent back¶
- Greens where the real field has none.
- A
VERIFYline left untouched. - Two lines onto one end with no default — neither would light.
- A line stopped short of the runway centerline, or a
Crossline not taken to the far side. - An unshared crossing — two light rows metres apart on one piece of pavement.
Scenery light exclusions (MSFS)¶
Many MSFS add-ons bake their own stop-bar and centerline lights into the scenery.
The MSFS app's Suppress scenery lights toggle blanks those inside small
exclusion zones, so XPGuard's lights are not doubled. You author the zones in
the editor.
- Turn on
Exclusion zones (preview)in the layer switcher. Every zone draws as a red dashed box. - Select a bar in edit mode and drag the box's four edge handles to grow or shrink it. Keep the box tight — MSFS blanks everything inside it, taxiway centerline lights included.
- The strips along lead-on lines are derived automatically. Only the bar boxes are editable.
Keep the scenery's lights (no exclusion)— per bar and per lead-on line. Tick it where the publisher's own lights are the ones to keep. XPGuard's own lights are unchanged either way.- An
Exclusion onlylead-on line covers the scenery's greens on a leg that is not a route.
Check it in a paired MSFS session:
Show exclusion zonemarks the selected bar's box on the pavement in the sim (amber markers). Pick a bar first.Ctrl+Shift+Eflips the sim hotkeys into exclusion mode:Ctrl+Shift+arrowgrows that edge,+Altshrinks it,+Eis done.
Mapping REL rows¶
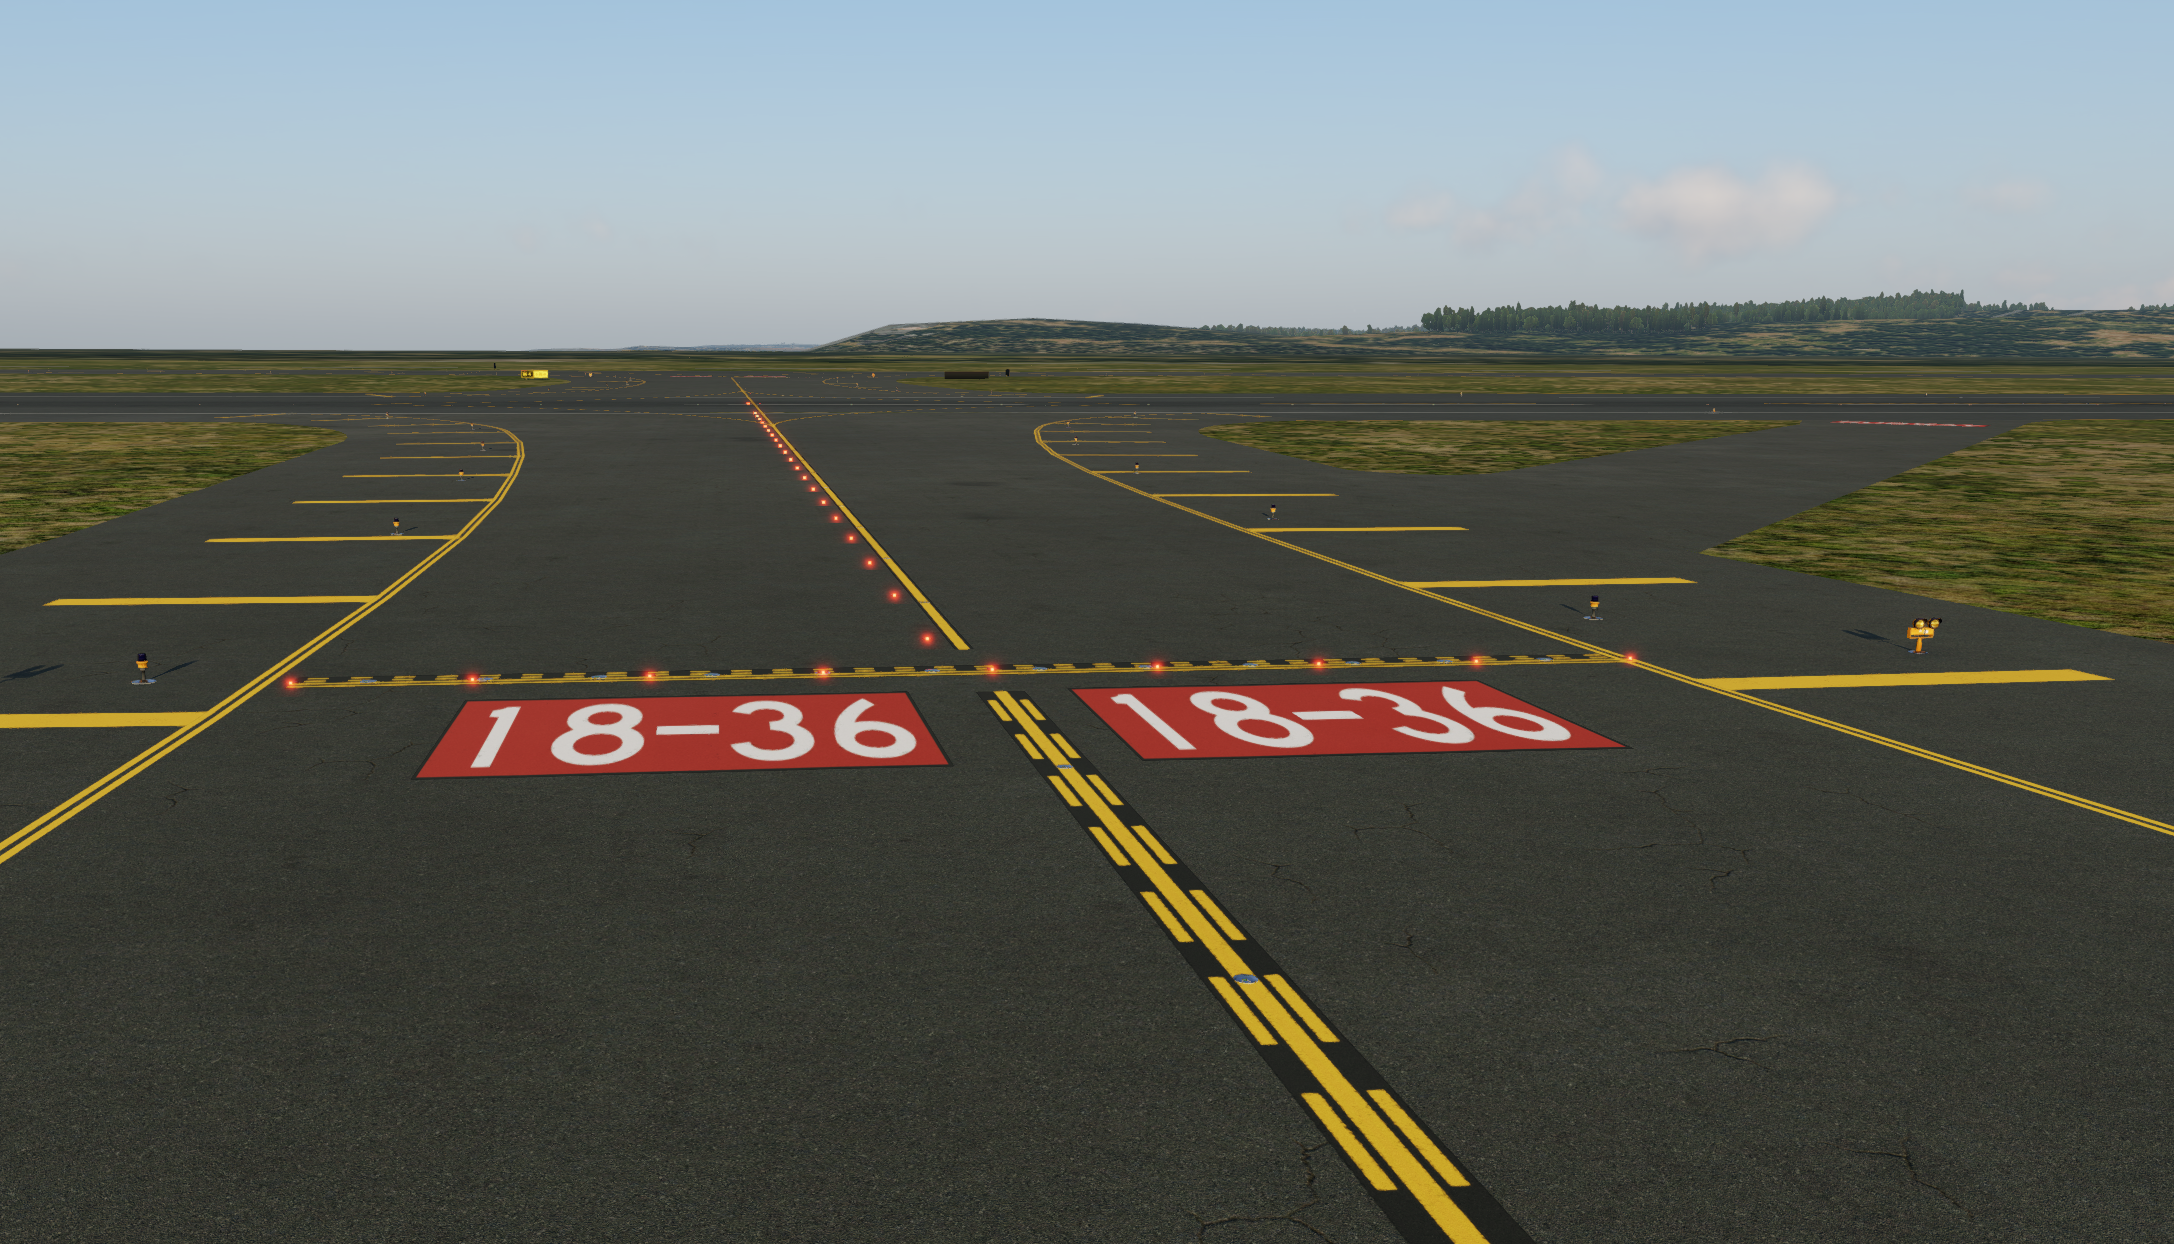
Runway Entrance Lights are a separate map from the stop bars, authored in the same editor.
- The
Bar | Lead-On | Reltabs at the top of the sidebar switch between them. - A REL row is submitted and reviewed with the rest of your map.
- The Rel tab is open to moderators for now. To apply, reach out on Discord.
Where a row starts and ends¶
A REL row runs from the holding position, along the taxiway, and onto the runway. The holding position is usually the CAT I one — the outer hold line where an aircraft waits in normal visibility.
Start at the CAT I hold, not the CAT II/III bar
Author the line at the holding position, usually the CAT I one. That is where the real lights begin.
Many airports have no physical stop bar there. Anchoring a row to the CAT II/III bar instead pushes the whole row 50–100 m back — the aircraft then waits on top of its own red lights. This is why REL is its own map, not tied to a stop bar.
Route it down the middle. Where the taxiway splits into two on the way to the runway (a Y, or a widened entrance), take the path through the center of the split and straight onto the runway — not down one branch. The server spaces the lights along the line you draw, so the line is the row.
What the server finishes for you
You draw the line onto the runway. You do not have to trim it or offset it. On publish the server:
- clips the row at the runway edge automatically,
- lays the lights offset from the taxi centerline (so they never sit on the Follow-the-Greens lights), and
- drops a final light offset onto the runway centerline, so a lined-up crew still sees the row.
Making a row¶
| Way | When to use it |
|---|---|
Place at aircraft |
Sim-paired sessions (the MSFS way). Taxi onto the CAT I holding position, stop, and click it — the hold line drops under the aircraft, across the taxiway. Use this where neither the map nor the satellite matches your add-on. With a row already selected, it moves that row's hold line there and re-cuts its path. That is how a row made at the CAT II/III bar gets to the CAT I hold. |
Draw hold line |
X-Plane / on-map. Click the two ends of the holding position, then Ctrl+click. Use it where you can see the holding position on the map. |
| From a stop bar | Click a bar you already mapped — the row is created on it, stays bound to it (move the bar, the row follows), and is drawn to the nearest assigned runway. |
Shaping the path¶
Trace Scenery Lines— fit the line to the lines the map is drawing: the add-on's own lines in a paired MSFS session, X-Plane's paint otherwise. Several fits offer a choice, exactly like the FTG editor.Trace sim— the same, from a breadcrumb trace you drove in the sim (see below). The button readsTrace MSFSorTrace X-Planewhen paired.Add shape points…— click along the line to drop points by hand. Add a bezier handle to a point and drag the arm to bend the curve (the sim lights the same cubic).Snap— the same magnet as the Lead-On tab, one shared setting. Click to cycle the source it pulls points onto.Protects runway— derived from the nearest centerline. Pick one to confirm or correct it.Light side—Autois the approaching pilot's left, which also keeps the row clear of the Follow-the-Greens centerline lights. PickRightwhere that side is already taken.
Tracing in a paired sim¶
The most accurate way to shape a row in MSFS is to drive the path yourself and fit the line to your track. It is the same trace flow the FTG editor uses.
- Open the editor from the app in a paired session, so the sim and the browser share a cursor.
- Press
Ctrl+Shift+Tto start recording a breadcrumb trace. Press it again to stop. (X-Plane: bind theXPGuard/ftg_trace_togglecommand to a key.) - Taxi from the CAT I hold, through the split, onto the runway. Then click
Trace MSFSto snap the line onto what you drove.
Slew, a joystick, and a small aircraft
- Fly a small, light aircraft (a Cessna-class single). Its reference point sits close to the ground and to the centerline, so the trace lands where the lights should — a widebody's reference point is metres off.
- Use the sim's slew mode and steer with a joystick, not the keyboard. Slew glides the aircraft smoothly and precisely along the pavement. Keyboard nudges leave a stair-stepped trace.
- Take it slowly through the split and the runway entrance — that is the part the fit cares about most.
Check it in the sim
Lightlights the selected row in the sim, so you can see how it lands from the cockpit — the clip at the runway edge and the datum light.All REL ON/All REL OFFflash every row, so you can walk the airport and confirm the lights land on the pavement.- Clicking a row also puts the aircraft behind its start node, facing along it.
Review & publishing¶
What happens after you submit:
- Your submission queues as pending. You get a confirmation email and a status badge in My submissions.
- On approve it replaces the published bars — the Base map, or that add-on's map — and reaches the sim almost immediately. Plugins pick it up on their next poll; no restart.
- On reject the live map is untouched. The reason reaches your dashboard and inbox, so you can fix it and resubmit.
Review is not all-or-nothing. The reviewer works bar by bar:
- Accept a bar.
- ✗ Reject it — that bar reverts to the published one.
- ✎ Edit it — they adjust it themselves.
Each ✗ and ✎ asks for a reason, and those reasons pre-fill your email. So the
published map can differ from what you sent, with a note telling you where and why. (A
reviewer may also come back with a needs-info question and an image before
deciding.)
Track everything in your dashboard → Contributions:
| Status | Meaning |
|---|---|
pending |
Queued, awaiting a reviewer. |
approved |
Published — live for everyone on that map. |
rejected |
Declined; the live map is untouched. Fix and resubmit. |
reverted |
A moderator later rolled the map back to its pre-submission state. If yours was the first map for that scenery it is unpublished entirely. The entry stays and can be approved again. |
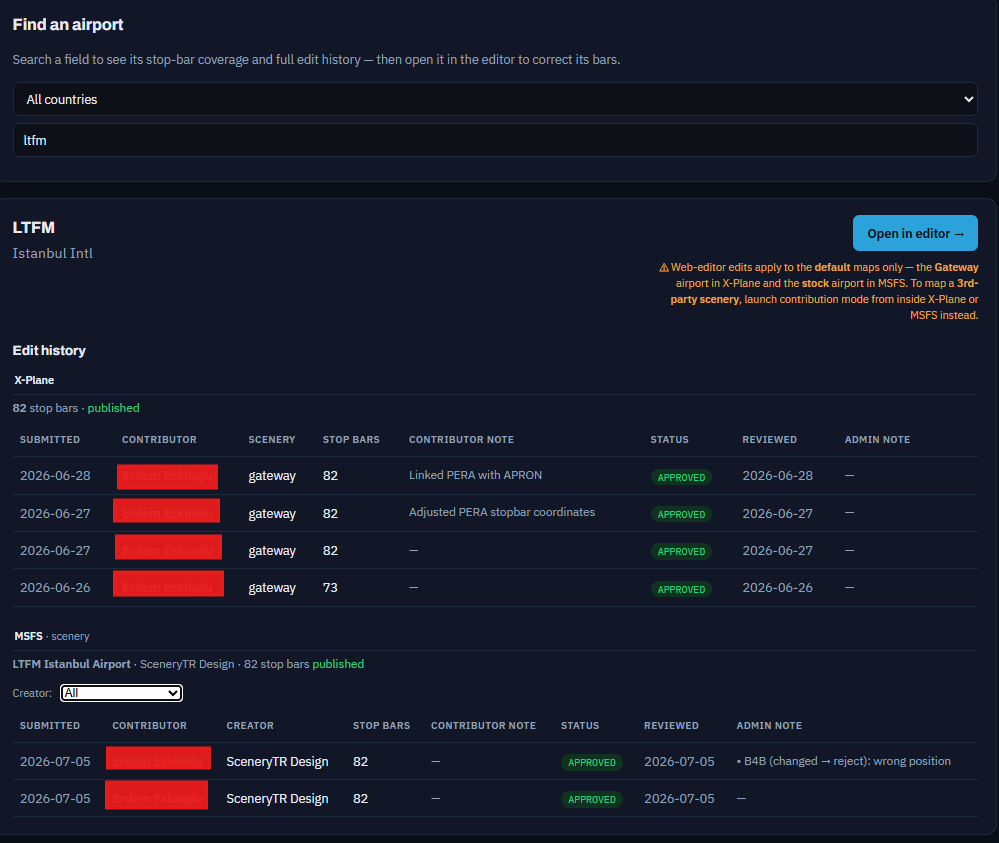
An airport's full edit history is under Find an airport — per sim, with the scenery and who reviewed each entry. Each status badge there is a link to a read-only what changed diff.
Moderators — who reviews your map¶
- Reviews are done by the XPGuard team and by community moderators.
- A moderator reviews their own countries' airports only. One scoped to Türkiye
sees the pending
LT··submissions. (Admins are unrestricted.) - Approval works the same either way: the map is checked against the real airport and published.
Want to become a moderator?
- Apply in the
#moderator-access-requestchannel on Discord. - A short form asks for your VATSIM CID, name, vACC and role.
- Every application is verified with the vACC before access is granted.
- Once approved you get an email, and a Review queue link appears in the site menu.
Taxi network (FTG) editor¶
The Follow the Greens taxi-network editor is open to moderators with an FTG access grant. The controller workflow it feeds is on the EuroScope page. To apply for FTG access, reach out on Discord.