
Map stop bars and IHP
A bar is a row of lights across a taxiway at a holding position. You draw it as a line of two or more nodes, and the lights are spaced along that line.
Every bar has a type: a red Stop bar, a Stop bar + IHP (red lights plus three amber lights), or IHP only (three amber lights, no red).
Add or select a bar
Section titled “Add or select a bar”Open the editor and stay on the Bar tab. The airport’s bars are already drawn.
- To select a bar, click it on the map or in the list. Its settings open in the Editing panel on the right.
- The Active runway, Default / LVP state and Bar type filters on the left only change which bars you see. They never change what you submit.
To add a bar:
- Click + Add bar.
- Click the map once for each node. You need at least two.
- Hold
Ctrland click to finish. - Type a name in Name.
Ctrl+right-click removes the last node. Esc cancels.
To delete a bar, select it and click Delete bar. Undo with ↶ or Ctrl+Z, redo with
↷ or Ctrl+Y. Up to 100 steps.
Runways
Section titled “Runways”Pick the bar’s runways in Assigned runways. Ctrl+click (⌘+click on a Mac) picks more
than one.
- Not at a runway? Pick APRON (shared / ground). Ground controllers share these bars.
- AUTO means the nearest runway centerline chose the runway and nobody checked it. Pick the runway yourself and it shows PINNED.
- After you move a bar, check its runway. A bar needs at least one runway or APRON.
Shape and aim the bar
Section titled “Shape and aim the bar”Select a bar. Blue dots mark its nodes.
- Drag a dot to move that node.
- Click a dot to select that node. It turns yellow.
- +● adds a node in the middle of the longest segment. A bar has at most 64 nodes.
- -● deletes the selected node. On a two-node bar this deletes the whole bar, so the editor asks first.
- Snap to nearest line moves the bar onto the nearest X-Plane painted line that runs the same way (within 15 m and 20°). It is not shown in an MSFS session.
- In a paired session you can also move nodes from the sim.
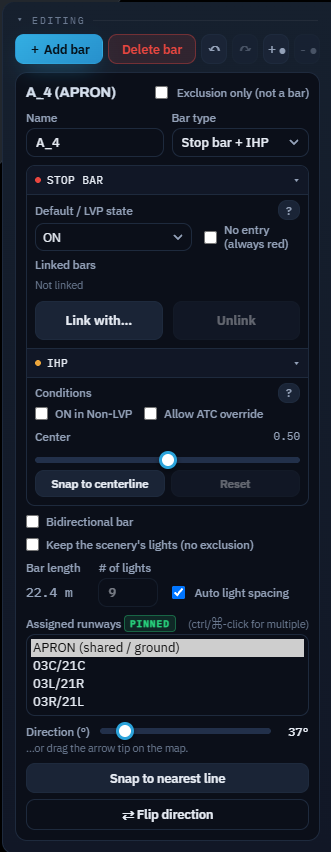
Auto light spacing spaces the lights for you. Untick it to type # of lights: one light goes on each end and the rest spread evenly. On a Stop bar + IHP the number includes the three amber lights and is always odd. An IHP only bar always has three lights.
Aim it
Section titled “Aim it”The cyan arrow shows where the bar shines. Point it toward the side where aircraft hold short.
- Straight bar: drag the arrow tip, or move the Direction (°) slider.
- Bent bar: each segment faces its own way. The slider shows per segment (use Flip).
- ⇄ Flip direction makes the bar shine to the other side. On a bent bar, every segment flips.
- Check the direction from the cockpit.
Bidirectional bar
Section titled “Bidirectional bar”Tick Bidirectional bar for a two-way apron or taxiway lane. The lights shine both ways, and controllers still see one bar. Leave it off for a normal hold-short bar.
Set the Default / LVP state
Section titled “Set the Default / LVP state”In the Stop bar section, pick the Default / LVP state. It decides when the red lights come on for a claimed runway.
| State | Red lights |
|---|---|
ON |
On in normal visibility and in LVP. |
Non-LVP only (CAT I) |
On normally, off in LVP. |
LVP only (CAT II/III) |
Off normally, on in LVP. |
OFF |
Off in both. A controller switches it by hand. |
The editor may set a bar to LVP only by itself when the bar sits on a painted CAT II/III
holding marking. Check those bars before you submit. For the controller side, see
LVP and default states.
To make two to four bars at one gate switch together, use Link with… under Linked bars. Only bars with red lights can be linked; an IHP only bar cannot. See Link stop bars at one gate.
No entry
Section titled “No entry”Tick No entry (always red) only on an exit-only taxiway where entry is prohibited.
- With
ON, the bar is red all the time, in every sim, in LVP and out. - With
LVP onlyorNon-LVP only, it is red all the time in that mode only. In the other mode it is a normal bar. - Controllers cannot switch it while it is held red.
- The editor does not let you pick
OFFand No entry together.
Choose the bar type
Section titled “Choose the bar type”Pick Bar type to match the lights at that holding position.
| Bar type | Red lights | Amber lights |
|---|---|---|
Stop bar |
Yes | No |
Stop bar + IHP |
Yes | Three, in the middle of the bar |
IHP only |
No | Three |
The panel has a Stop bar section and an IHP section. The section for lights the type does not have is grayed out and folded. Click its title to open it and read it.
- When you change a Stop bar to Stop bar + IHP or IHP only, ON in Non-LVP and Allow ATC override start unticked.
- IHP only has no red lights. It removes the bar’s No entry, its lead-on lines and its link. The editor asks before it removes lines or a link.
Choose when amber lights
Section titled “Choose when amber lights”In the IHP section, under Conditions:
- In LVP, automatic amber is always on.
- Tick ON in Non-LVP to keep it on in normal visibility too.
| ON in Non-LVP | Normal visibility | LVP |
|---|---|---|
| Unticked | Off | On |
| Ticked | On | On |
Tick Allow ATC override to let a controller choose IHP ON, IHP OFF or IHP automatic (controller view). Unticked, the amber stays automatic.
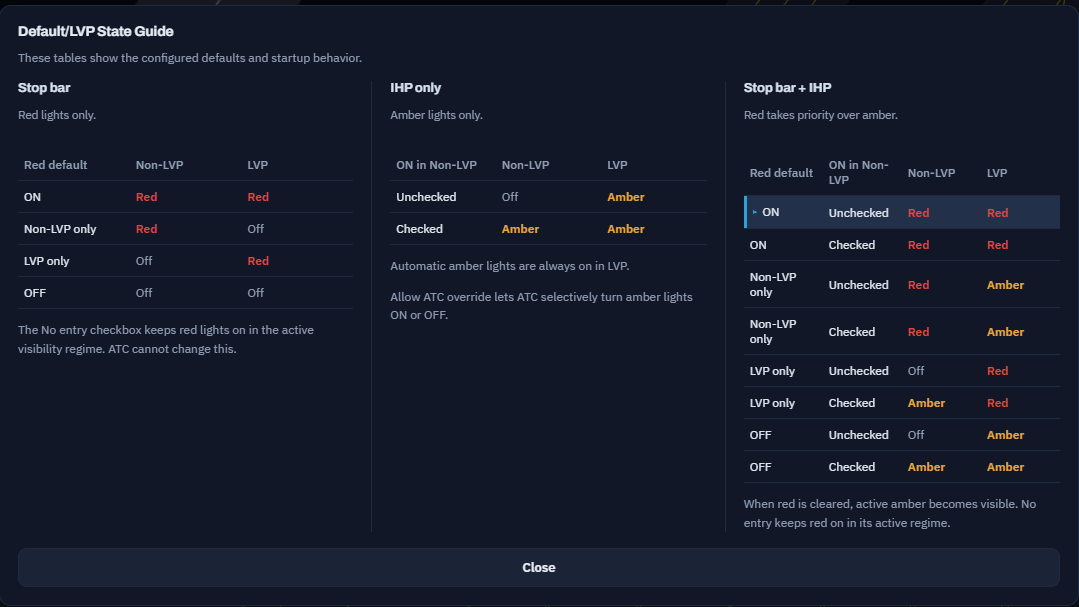
On a Stop bar + IHP, red takes priority: red and amber are never on together. When red goes off, amber shows if its condition calls for it. If No entry keeps red on wherever amber would light, the editor warns you.
The red Default / LVP state and ON in Non-LVP are separate settings. Click ? to open the Default/LVP State Guide. It has a table for each bar type and marks the selected bar’s row.
Position the three amber lights
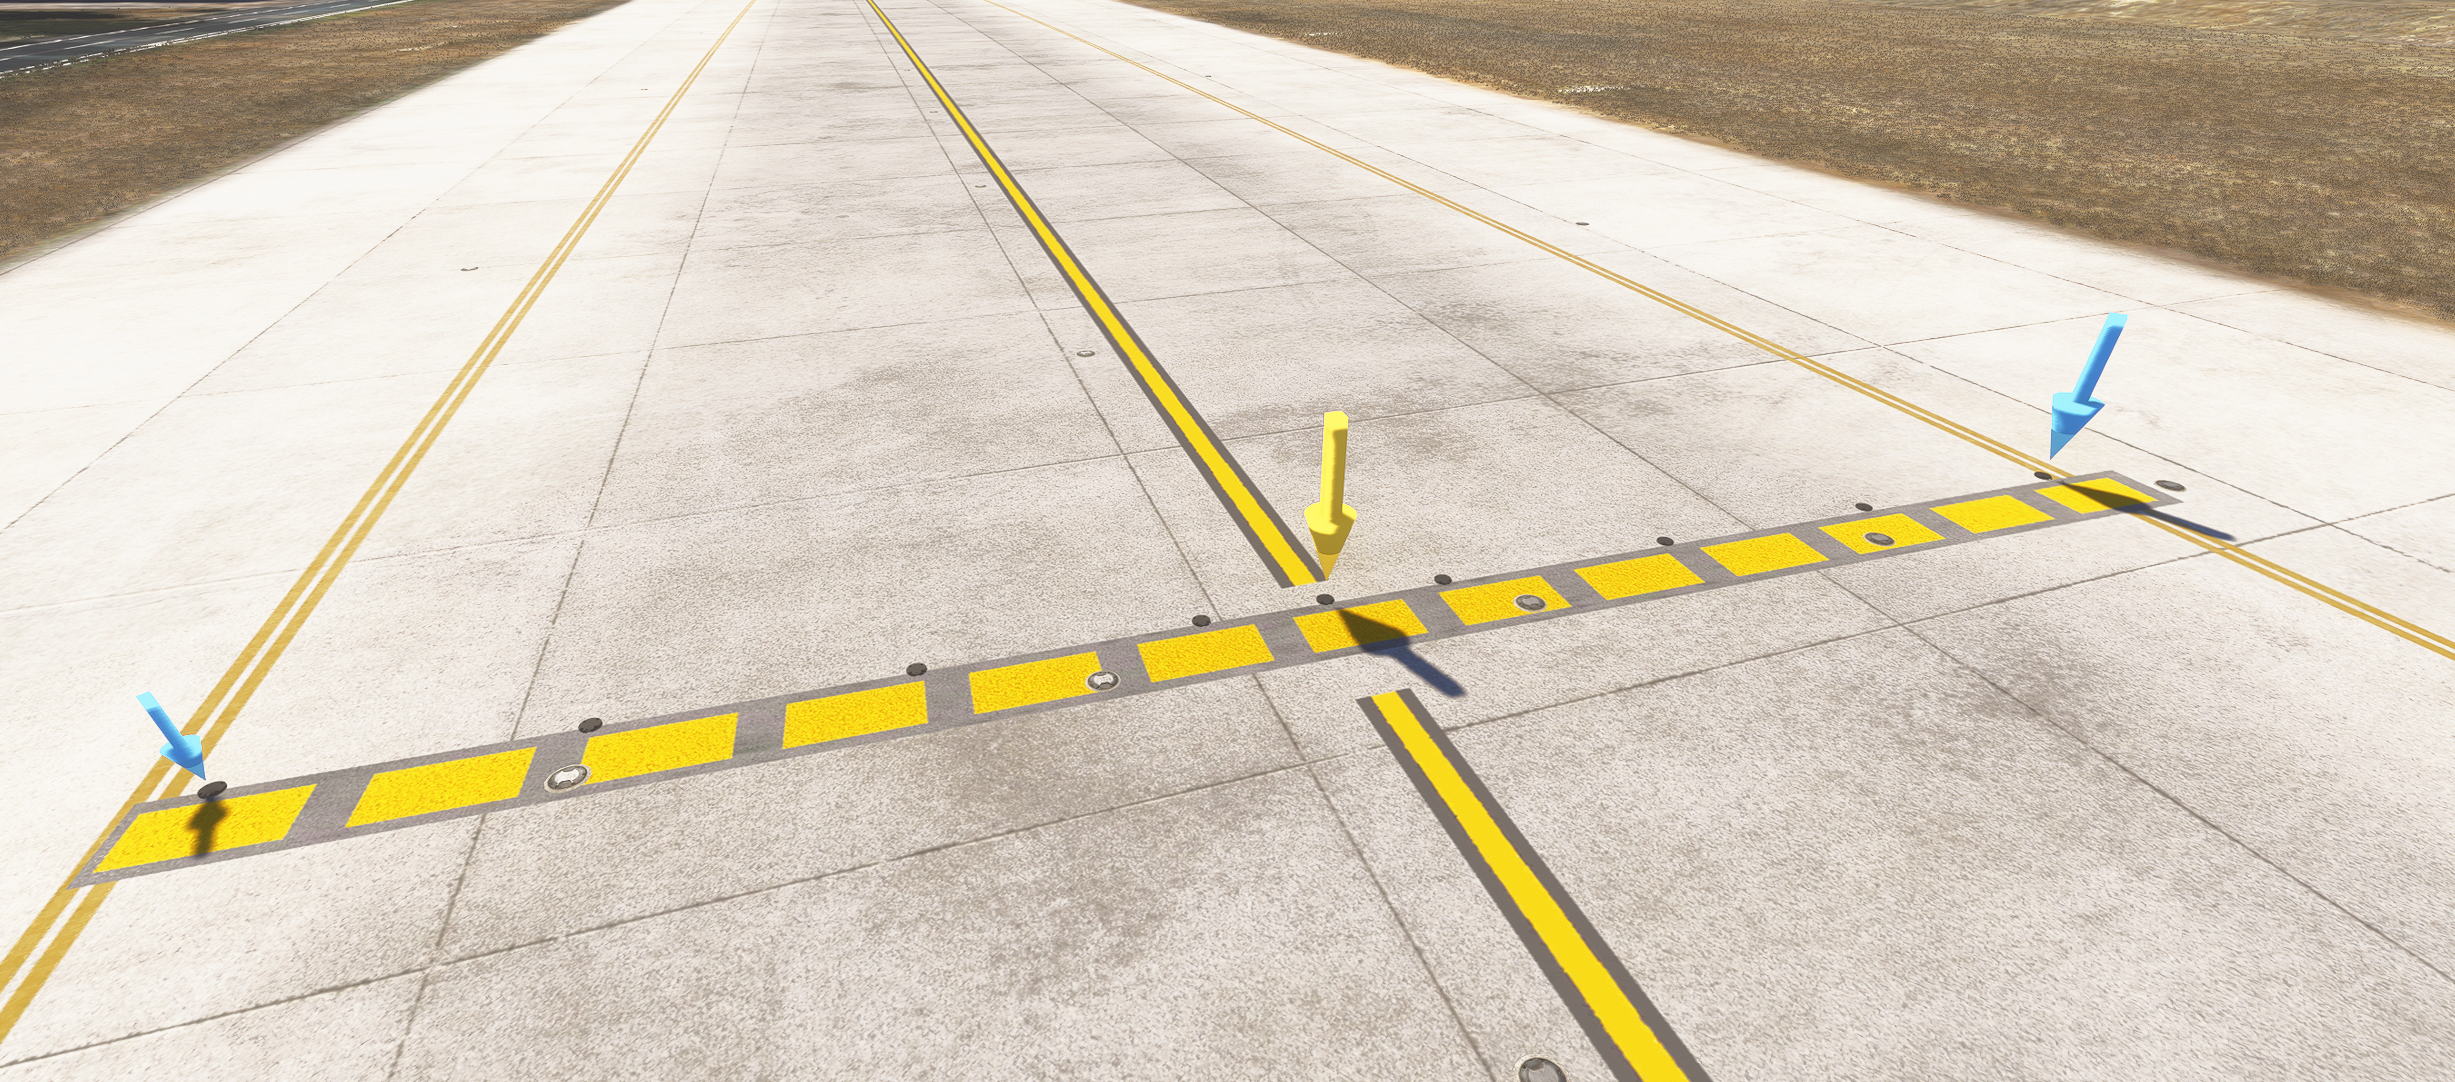
Section titled “Position the three amber lights”The three amber lights are 1.5 m apart and start in the middle of the bar. If the middle is not on the taxiway centerline, move them without moving the red bar:
- Select the bar.
- Drag the amber handle along the bar, or move the Center slider.
- Check the three amber lights from the cockpit.
- Snap to centerline moves them to where the painted taxiway centerline crosses the bar. If several centerlines cross it, click the one you want on the map. It uses X-Plane painted lines, so it is not shown for MSFS maps.
- Reset moves them back to the middle.
- Center runs from 0 at one end to 1 at the other. The middle is 0.50. The value beside it also shows the distance from the middle in meters.
- The three lights always stay on the bar. On a bar shorter than the row, they cannot move.
- In a paired session,
Ctrl+Alt+←→moves them 0.25 m from the sim.
Scenery lights
Section titled “Scenery lights”Many MSFS add-ons have their own stop-bar and centerline lights. With Suppress scenery lights on in the MSFS app (the default), those lights are hidden inside a small exclusion zone around each bar, so the lights are not doubled.
- Turn on Exclusion zones (preview) in the layer switcher. Each zone is a red dashed box.
- Select a bar in edit mode and drag the four edge handles of its box. Keep the box tight: MSFS hides every light inside it, taxiway centerline lights too.
- The zones along lead-on lines are made automatically. You can only edit a bar’s box.
- Exclusion only (not a bar) turns the bar into an exclusion zone. It has no lights and controllers do not see it. It only removes the scenery’s own lights at that spot.
- Keep the scenery’s lights (no exclusion) leaves the add-on’s own lights on at this bar. XPGuard’s lights do not change.
In a paired MSFS session, click Show exclusion zone to see the selected bar’s box on the pavement in the sim (amber markers). To change the box from the sim, use the exclusion zone keys.
Check it in the sim
Section titled “Check it in the sim”In a paired session, the Lights & mode panel switches the lights in the sim:
- Edit on: you edit bars. Edit off: click a bar to switch its light.
- All ON lights red on every bar with red lights, and amber on IHP only bars. All OFF turns everything off. Both act only on the bars the filters show.
- The Red OFF / Red ON and Amber OFF / Amber ON buttons beside the section titles switch the selected bar. On a Stop bar + IHP, turn red off before you switch amber.
Check each bar from the cockpit. On a bidirectional bar, look from both sides.
Save and submit
Section titled “Save and submit”- Click Save draft while you work. Wait for the saved time beside it.
- When you are done, click Submit.
- Under Summarize the changes you made, write what you changed, for example Fixed the C3 bar direction, removed a false bar at A1. The reviewer reads it.
- Click Submit for review.
A saved draft stays private. Continue it later from your dashboard. See Submit and track your map.