Pilots — MSFS
XPGuard for MSFS is a small tray app. It runs alongside Microsoft Flight Simulator 2020 or 2024 and draws the guidance lights in the sim, live over VATSIM.
It renders:
- Stop bars
- Takeoff Hold Lights (THL)
- Runway Entrance Lights (REL)
- Lead-on/off lights
- Follow the Greens (FTG)
You never switch the lights yourself. Controllers drive them from EuroScope or vatSys. Your job is to read them — see The lights for what each one means.
2020 and 2024 are both supported
One installer, both sims. The app copies the correct SimObject package into each Community folder you tick. It detects which sim you are connected to automatically.
MSFS 2020 vs 2024
Everything on this page works in both sims, with two differences:
- Auto-brightness needs MSFS 2024. MSFS 2020 does not report the sim's light level, so on 2020 the Auto toggle stays off and the manual sliders drive the lights.
- The lights look slightly different. Each sim has its own light package. On 2020 every light renders with its ground glow pool; the point-only (no-glow) look is a 2024-only option.
Scenery light suppression works on both.
Installation
Steps:
- Download the MSFS installer from xpguard.net — no account needed.
- Run the downloaded setup (
XPGuard-MSFS-Setup-x.y.z.exe). It is a per-user install — no administrator rights needed.
The installer does four things:
- Installs the tray app.
- Finds your MSFS Community folder(s) — 2020 and/or 2024, Steam or Microsoft Store. It copies the stop-bar package into the ones you tick (figure below). There is also a box per sim for a custom or linked Community folder.
- Installs the vPilot bridge — a small plugin that tells XPGuard when you are connected to VATSIM. It finds vPilot by itself; if it cannot, it asks you to point at your vPilot folder.
- Optionally sets XPGuard to start with Windows (recommended — it lives in the tray).
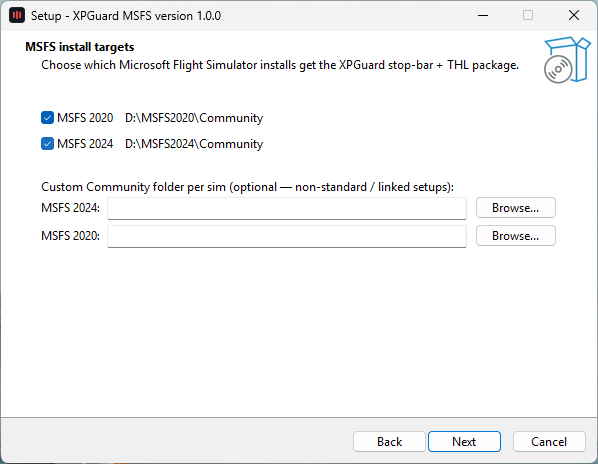
Needs .NET Framework 4.8
The installer checks for it, warns, and asks whether to carry on. If it is missing, install .NET Framework 4.8 and re-run setup.
Install XPGuard while MSFS is not running
Community content only loads when the sim starts. So restart MSFS once if it was running when you installed — or when the app later updates the package.
For the real VATSIM light state, the app reads vPilot through the bridge the setup installed.
After install, XPGuard runs in the system tray. Double-click the tray icon to open the window.
The app window
The window (figure below) is borderless. Resize it from the grip in the bottom-right corner.
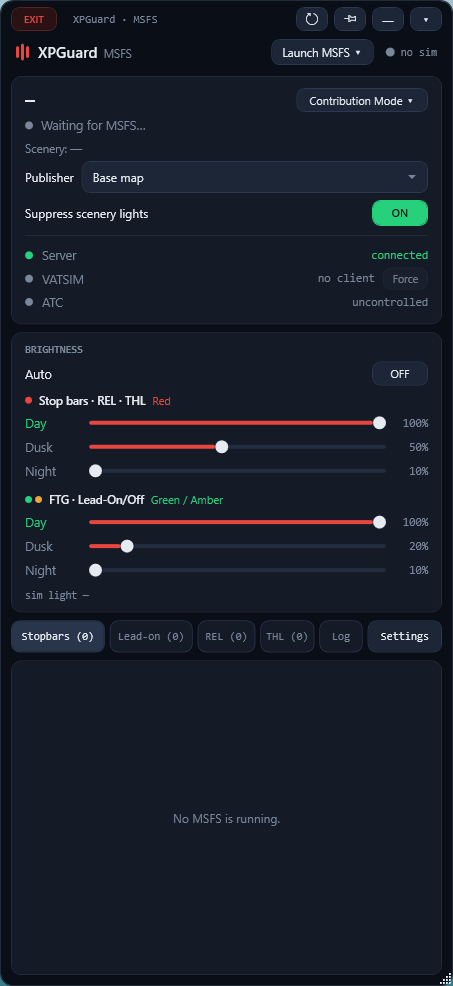
The title bar has a red EXIT on the left. On the right are four buttons:
| Button | Action |
|---|---|
| ⟳ Refresh | Full reconnect: re-detect the airport and scenery, reload the light objects. Use it if the scenery reads wrong. |
| 📌 Pin | Keep the window always on top. |
| — | Minimize to the taskbar. |
| ▾ | Hide to the tray. |
There is no close button
Alt+F4 and ▾ only hide the window — XPGuard keeps running. To quit for real: click EXIT, or right-click the tray icon → Exit.
Below the title bar, Launch MSFS ▾ starts the sim. The dropdown offers MSFS 2020 or MSFS 2024. A dot beside it shows whether MSFS is connected.
Launch XPGuard before MSFS
If "Suppress Scenery Lights" is selected, start the XPGuard before launching MSFS to ensure correct packages are loaded automatically. Otherwise, XPGuard will warn you that MSFS needs a restart.
The status card
The card at the top shows everything about the current airport:
- Airport and a live state line — for example
Active · 1 lit / 12 bars · 2 REL · 3 THL. The bar count always shows; REL and THL are left out when the airport has none. - Scenery — the add-on detected here, or the built-in airport — plus a Publisher dropdown. See Scenery & publisher.
- Suppress scenery lights — Suppresses the scenery's own stop bar, lead-on/off and FTG lights, so only XPGuard's controlled lights show (RECOMMENDED). See Suppress scenery lights.
- Server / VATSIM / ATC — connection state and who is controlling.
- A green
Cancel FTGbanner — appears here while a Follow-the-Greens session is running. This is the home for cancel when the in-sim card is hidden. Contribution Mode ▾— the map editors. See Contribution mode.
Force sits on the VATSIM row:
- Always visible. Clickable only while vPilot is running and no connection is confirmed. Otherwise dimmed.
- Switch it on and the row turns amber, reads
vPilot · forced, and the lights appear anyway. - A confirmed connection clears it automatically.
Brightness
The BRIGHTNESS card sets how strong the lights glow. Everything here is remembered between sessions. There are two groups:
- Stop bars · REL · THL — the red lights. Day / Dusk / Night sliders; the three families share the red level.
- FTG · Lead-On/Off — the green and amber lights: Follow the Greens, lead-on and lead-off. Their own Day / Dusk / Night sliders, dimmed separately from the red.
The tier follows the sun — the label of the live tier turns green. A readout at the bottom shows the sim's own light level — for example sim light 0.35. On MSFS 2020 it reads sim light —; that sim does not report a light level.
Auto-brightness
Turn on Auto and XPGuard picks the level for you. It reads the sim's own light and follows a calibration curve the server serves. There is one curve for the red group and one for the green, so the two can differ.
Auto replaces the six sliders with four — a range per group:
- Max — the brightest that group will go (bright daylight).
- Min — the dimmest (deep night).
The readout shows what Auto derived — sim light 0.35 · → 60%, or red 40% · green 60% when the two groups differ.
Note
Auto needs a server connection and MSFS 2024. On MSFS 2020 it is greyed out — the sim does not report its light level.
Settings
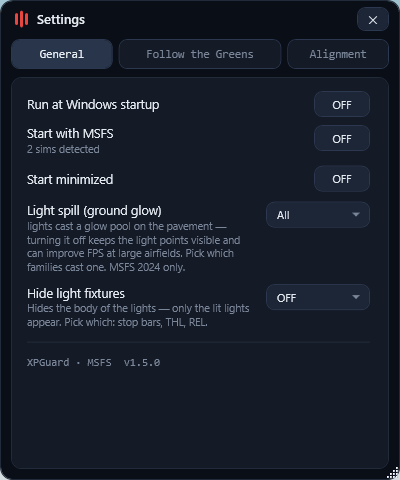
Click the Settings tab and Settings opens as its own window, docked beside the main one (figure below). It has three categories along the top: General, Follow the Greens and Alignment.
General
- Update available — vX.Y.Z — XPGuard updates itself.
- When a newer version is found, a green card with release notes appears here, and the tab reads
Settings •. Once per session, a flyout and a tray balloon point you at it. - Download & update confirms, downloads, and closes XPGuard. Run the setup, then reopen XPGuard yourself.
- Updating is refused while MSFS runs — close the sim and press Update again.
- When a newer version is found, a green card with release notes appears here, and the tab reads
- Run at Windows startup — launch XPGuard with Windows. Pair it with Start minimized to go straight to the tray.
- Start with MSFS — register XPGuard in the sim's add-on launcher (
exe.xml), so MSFS starts it and closing MSFS closes it. This is independent of Run at Windows startup. A line under the toggle shows how many sims were detected; with no MSFS install it is greyed out. You must close MSFS before toggling it — the sim locksexe.xmlwhile it runs. - Start minimized — launch straight to the tray, with no window. The first launch after install always shows the window.
- Light spill (ground glow) — each lit fixture casts a glow pool on the pavement. Turning it off keeps the light points visible and can improve FPS at large airfields. Pick which families cast one: stop bars, THL, REL, Lead-On/Off, FTG. Lead-on starts off. MSFS 2024 only — on 2020 every family always casts its pool and this setting does nothing.
- Hide light fixtures — hides the body of the lights so only the lit lights appear. A checkbox popup picks which: Stop bars, THL, REL.
Further reading — RWSL in the real world
XPGuard's THL and REL follow the Runway Status Lights (RWSL) system. RWSL is an ICAO-recognised runway-safety concept operated in the real world by EUROCONTROL and the FAA:
Follow the Greens settings
- Auto-accept control requests — accept a controller's FTG request without the popup.
- Do not show FTG card — hide the in-sim active-session mini card. The green
Cancel FTGbanner on the status card takes over. (The Accept / Reject request popup is unaffected.) - Hide other traffic's FTG — only your own green route shows; other aircraft's Follow-the-Greens stay dark.
- Put-back radius — at a light-suppressed FTG airport, how far around you the taxi centreline greens are re-lit while no session runs. 150–3000 m; the top of the range means unlimited.
Alignment
Height offset — a small vertical nudge for when the lights sit above or under the pavement on your system.
- One slider, −5 m to +5 m in 0.05 m steps.
Resetputs it back to 0. The offset is not saved — every launch starts at 0.
This is a personal tweak. For a bar sitting in the wrong place, use contribution mode.
The tabs
Six tabs switch the lower panel:
| Tab | Shows |
|---|---|
| Stopbars (N) | Every controlled stop bar, the runway it protects, and whether it is red. |
| Lead-on (N) | Lead-on light rows — one per branch, named after the stop bar it leads through. In contribution mode, clicking a row jumps to that bar. |
| REL (N) | Runway entrance lights — one row per mapped holding position, grouped by the runway it guards. |
| THL (N) | Takeoff hold lights — one array per runway end, derived from the runway geometry. |
| Log | The live log, at Info (default) or Debug. Saved to XPGuard-MSFS.log next to the app. |
| Settings | Opens the Settings window (see above). |
A row can carry an amber INOP chip: that light is declared out of service on the server. It will not come on when a controller switches it.
Seeing the lights
Lights render only below ~1,000 ft AGL — above that the app idles and draws nothing. The dark fixtures appear on their own; the controller-driven red needs you connected to VATSIM.
- Start MSFS. XPGuard connects automatically, or use
Launch MSFS. If you installed or updated while MSFS was running, restart it once. - Check your scenery. The status card should show the detected scenery with Publisher matching. If not, hit ⟳ Refresh or pick the right one — see Scenery & publisher.
- Connect to VATSIM with vPilot. Bars only light while you are online — offline you see the dark fixtures only. If the VATSIM row does not pick it up, switch on Force.
- Taxi toward a runway. Lights render below ~1,000 ft AGL; the app idles otherwise.
For the red families — stop bars, THL and REL:
| State | Meaning |
|---|---|
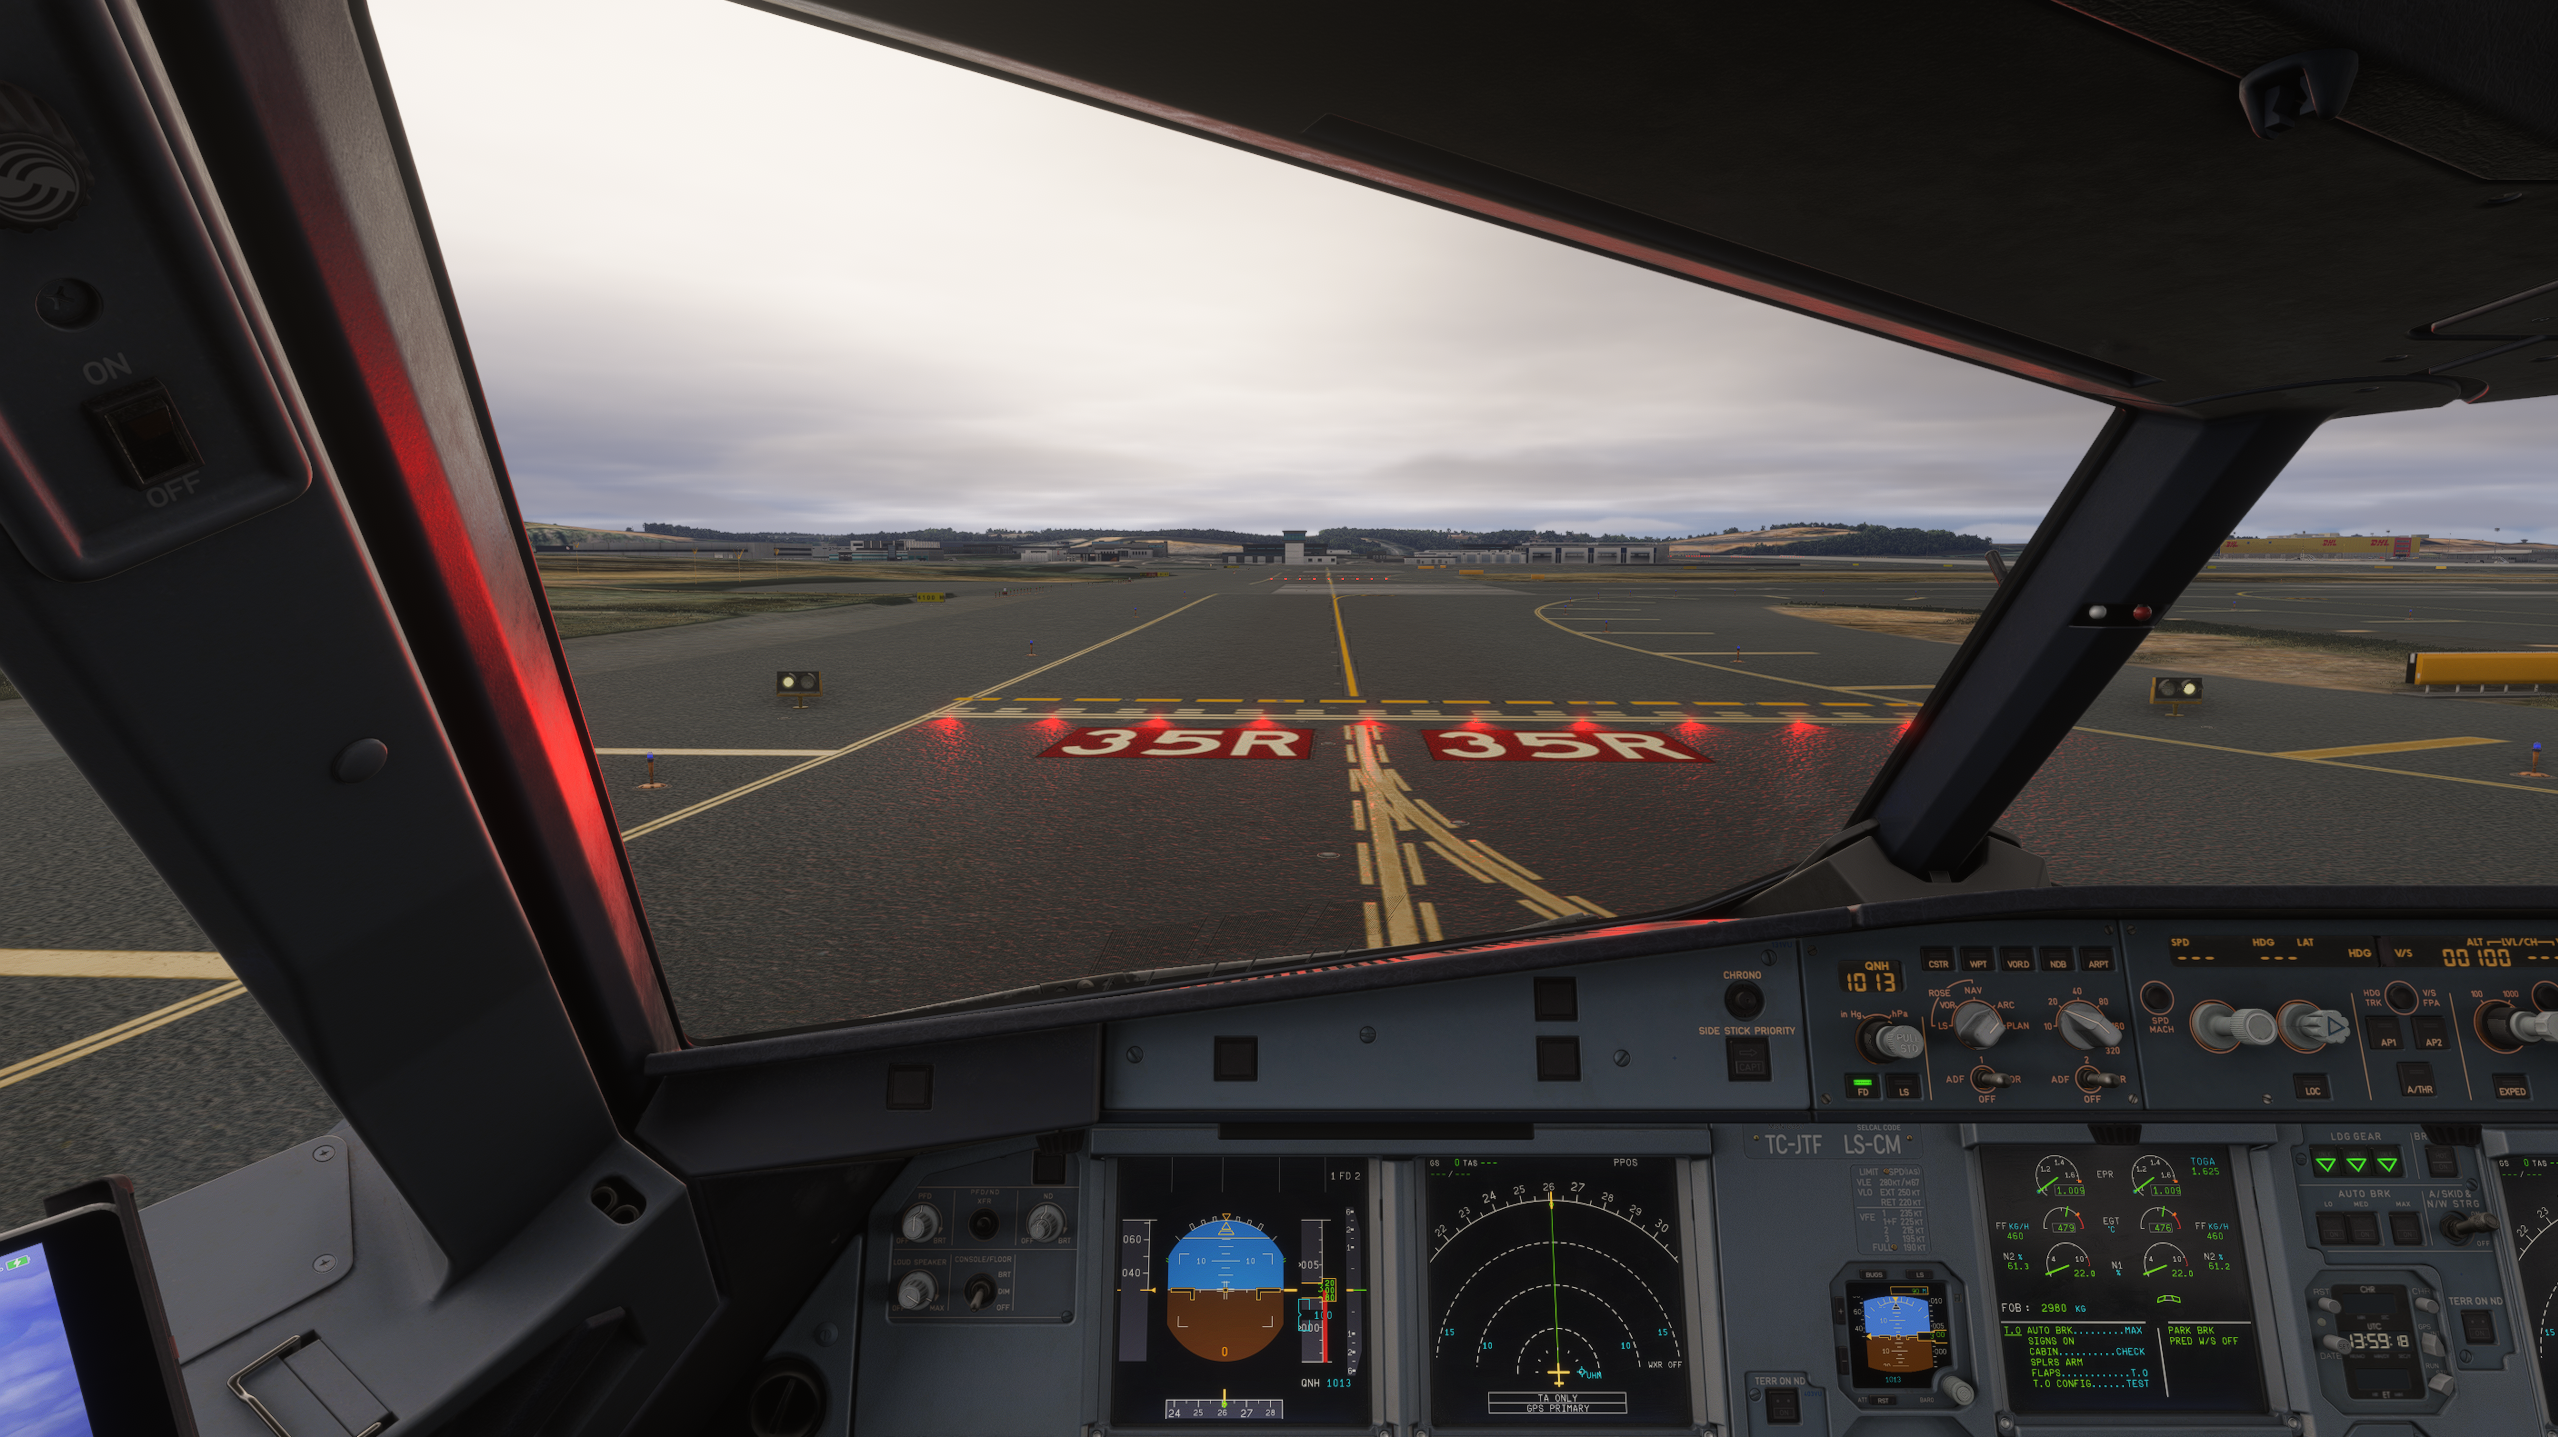
| Red | Hold short — do not cross / enter / begin the roll (first figure below). |
| Dark (off) | No restriction from this light (second figure below). These lights are never green. |
The green lights you may see are different fixtures — lead-on rows and Follow the Greens. See The lights.
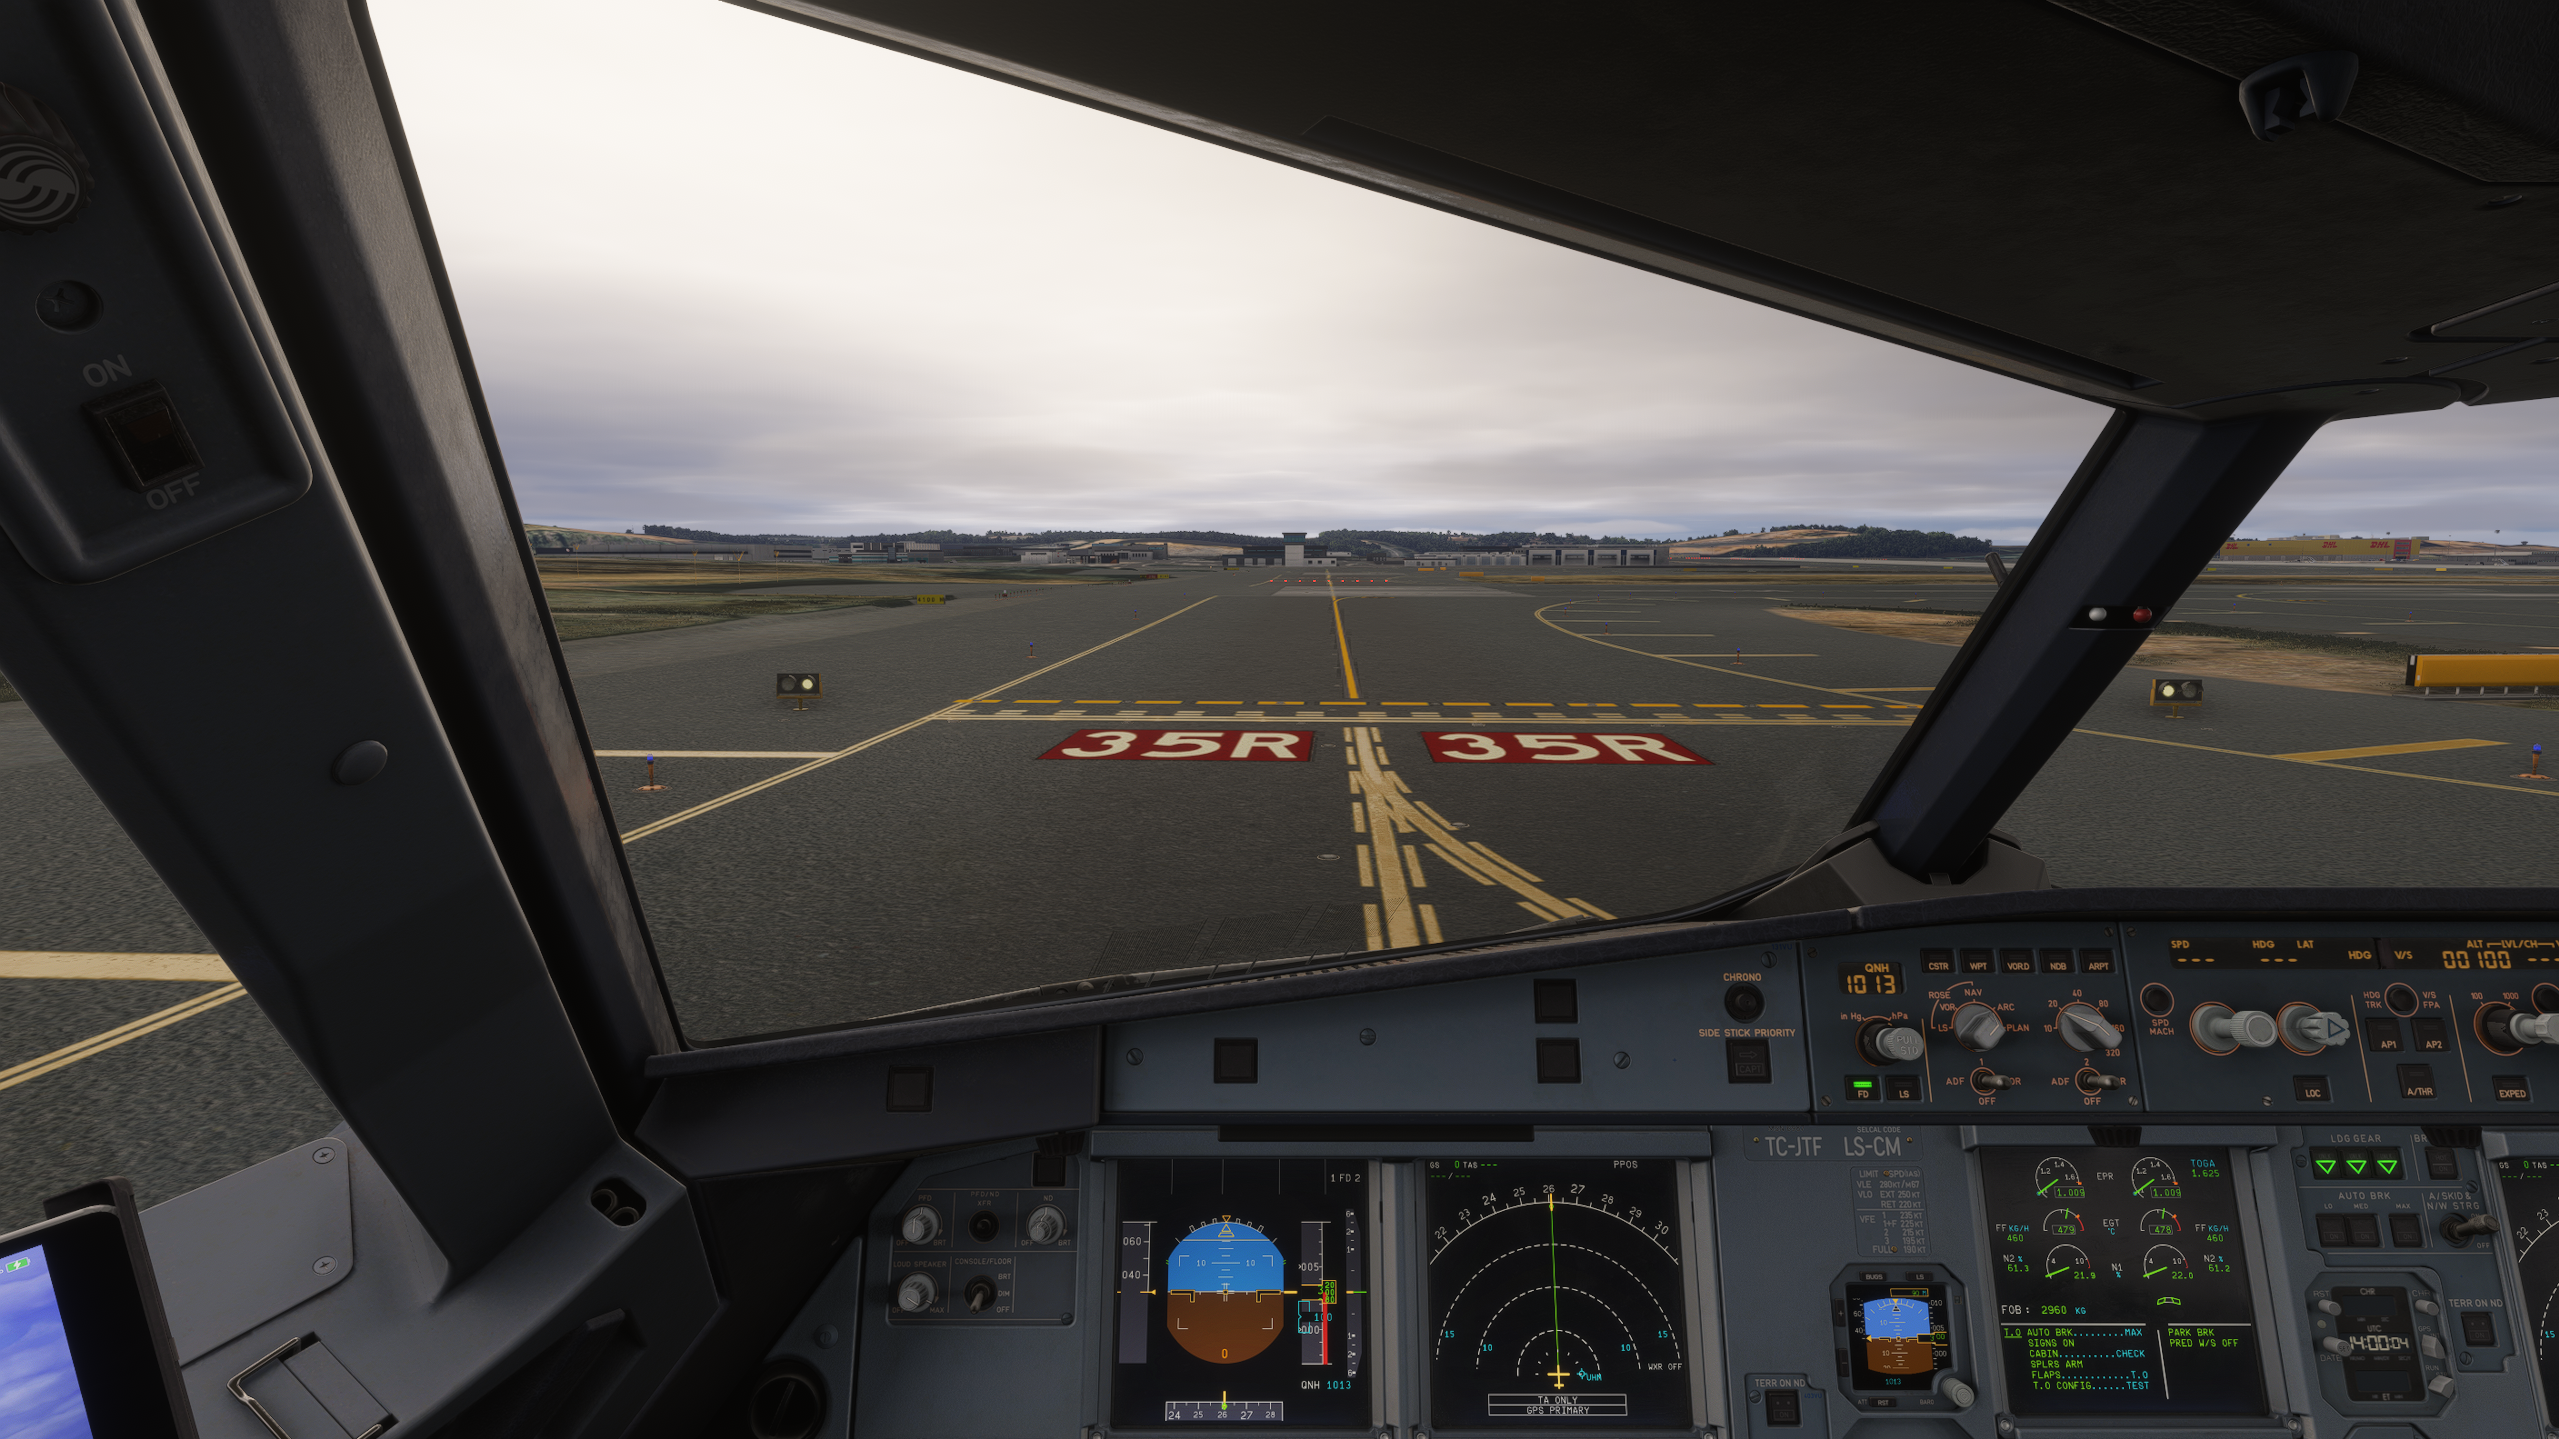
A dark light is never a clearance
Dark only means XPGuard sees no restriction. Your clearance always comes verbally from ATC. This is true of stop bars, THL and REL alike.
No controller, no lights
THL and REL come entirely from the controller's ground-radar picture. A stop bar with nobody online stays dark too. With no controller — or none with that light armed — you see nothing. That absence is not an all-clear.
Nothing showing?
Check in this order:
- Connected to VATSIM
- Below ~1,000 ft AGL
- MSFS connected (top of the app)
- The package in your Community folder
- A controller online
For what each light means and how much of a THL/REL array lights up, see The lights.
Follow the Greens
Green taxiway centerline lights a controller switches on to lead you along your cleared route (figure below).
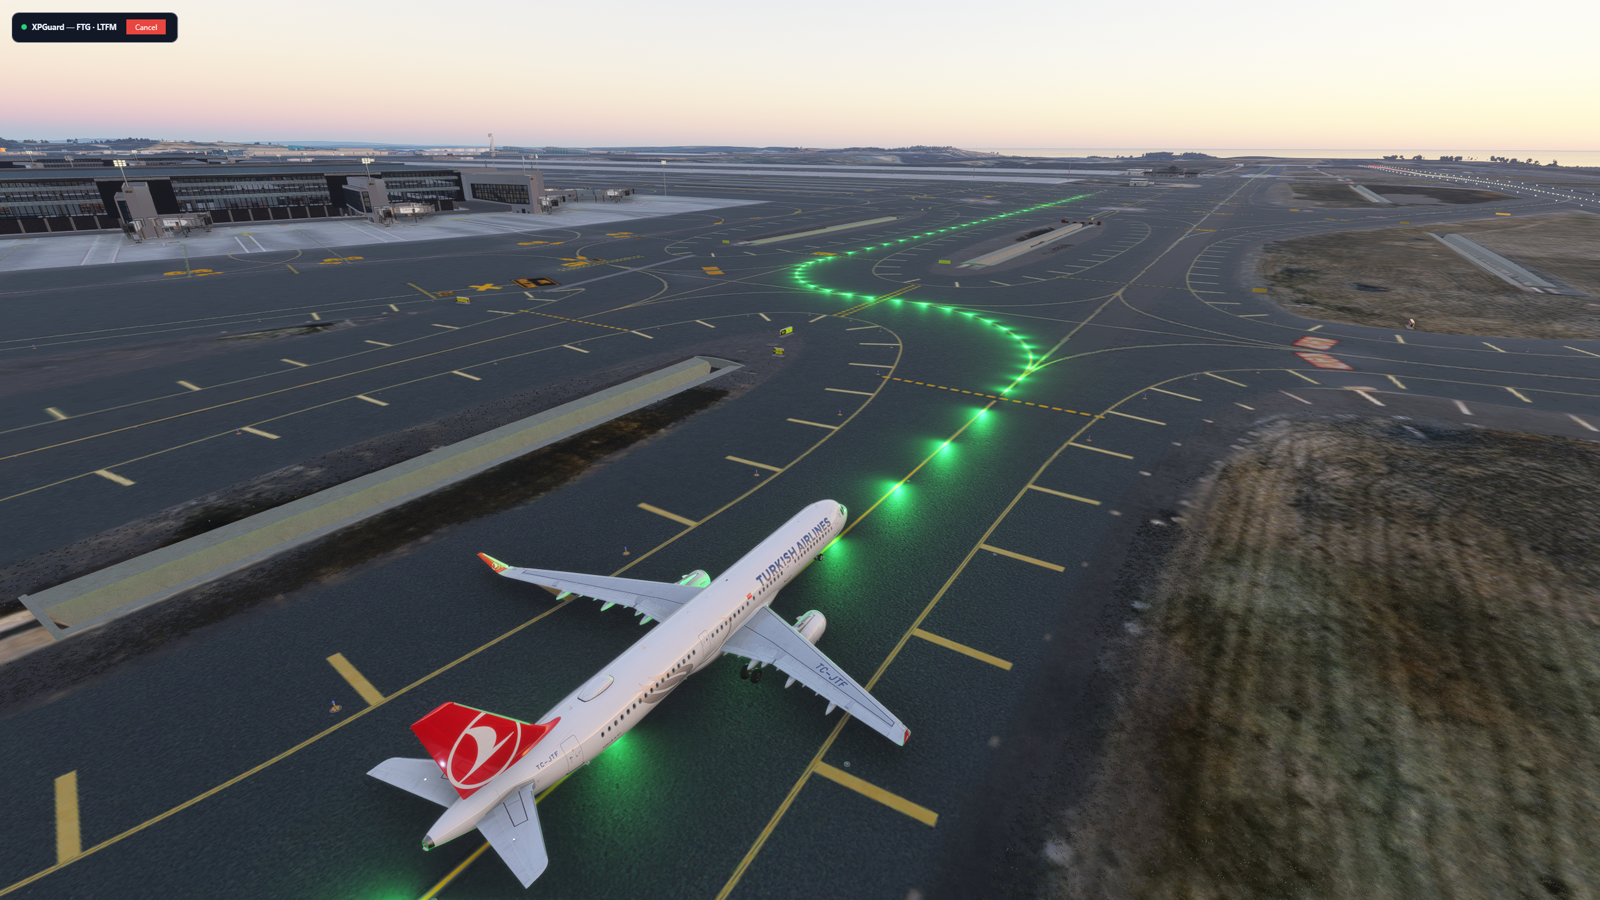
- Controller-driven and VATSIM-only — there is nothing to switch on in the app.
- Needs a controller who offers it and a published taxi network for the scenery you fly. If nothing lights, that is normal.
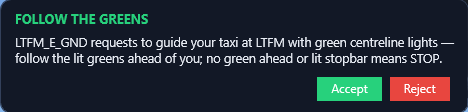
- A controller starts FTG. A consent popup (first figure below) names them, with Accept / Reject. (Turn on Auto-accept in Settings — the popup offers the same checkbox.)
- Accept, and an always-on-top mini card (second figure below) shows the session is live. Hide it with Do not show FTG card and cancel from the status-card banner instead.
- Greens trace your route on your installed scenery. Follow them. The lit stretch rolls forward with you as ATC advances the route.
- The greens stop at your hold-short bar — where the line ends is where you hold. They extend past it once you are cleared, and never light green past a red bar.

Green brightness is separate
The greens use the FTG · Lead-On/Off sliders — or their own Auto range — independent of the red stop bars.
Off-center greens?
The greens align to the scenery your Publisher names. If they sit off the centerline, confirm or change it — same as the stop bars (see Scenery & publisher).
Scenery & publisher
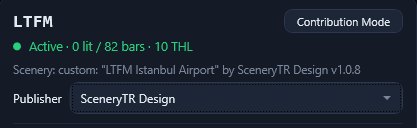
Add-on airports paint their markings in slightly different spots than the built-in one. So XPGuard keeps a separate stop-bar map per scenery. The app reads which scenery you are using from the add-on's own package info and shows it on the status card (figure below).
What you get:
- Built-in / stock airport → the Base map. It can also have its own MSFS · Stock map once one is contributed — when that one is serving, the Base row reads
Base map (MSFS Stock). - An add-on you installed → XPGuard auto-selects that publisher (MSFS · <creator>) and serves its aligned bars, when a map exists.
The Publisher dropdown (figure below) sets it by hand, and a hand-pick is remembered for that scenery. You normally never touch it — XPGuard matches your scenery and auto-selects. The list only offers publishers already published here. If yours is not listed, no map for it has been contributed yet — you can be the first.
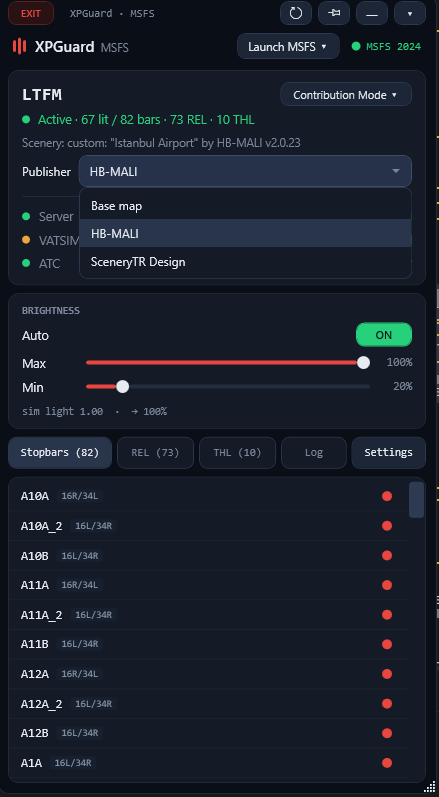
Which map you get
Controllers always work the Base map — one set of bars per airport, switched by the bar's name. Pilots get the scenery-specific map for what they fly, or the Base map if none exists.
So a controller lights bar C1 and every pilot sees C1 turn red, each at the spot that matches their own scenery.
Suppress scenery lights
Many add-on and stock airports bake their own stop-bar lights into the scenery. Those are always on — they never follow the controller. Suppress scenery lights on the status card blanks them at supported airports, so the only lights you see are the ones XPGuard controls.
- ON by default. Flip the toggle under Publisher to turn it off.
- The first enable downloads suppression files. An amber line under the toggle reads
Preparing suppression files — wait before starting MSFS; a tray balloon tells you when it is ready and you can start the sim. - MSFS reads scenery once, at startup. If the sim is already running when the files change, XPGuard names the airports and asks you to restart MSFS. Starting the sim from the app's
Launch MSFSbutton keeps the files current automatically. - Works on MSFS 2020 and 2024.
- If the hint says another program is holding the Community folder (an add-on manager, antivirus), wait — XPGuard retries by itself. Nothing to do.
- When more than one add-on draws the same airport, a Which add-on? question appears. Pick the scenery you actually see; XPGuard remembers the answer.
The one exception to 'no controller, no lights'
Where XPGuard suppressed a scenery's own lead-on lights, it draws its own green lights there even with nobody controlling.
Contribution mode
If bars sit wrong, or there is no map for your add-on yet, you can fix it from inside the sim. Click Contribution Mode ▾ on the status card:
- BAR · LEAD-ON · REL — map this airport's stop bars, lead-on lights and runway entrance lights. It pairs a browser editor with your running sim and mirrors your edits live. It needs a detected add-on scenery, or it maps the built-in airport as its own MSFS · Stock map (from either sim). The Base map is edited from the web editor.
- Taxi Network — the Follow-the-Greens editor. Moderators with the FTG grant only.
If several add-ons cover the airport — or your Publisher pick is not what is loaded — a Which scenery? dialog asks which one you are mapping before the session starts.
MSFS moves your aircraft
In MSFS, contribution mode teleports your aircraft to each bar you inspect — it cannot fly a free camera the way X-Plane does. The plane will jump around the airport; that is expected. Do it parked on the ground, not mid-flight. Leaving contribution mode returns you to normal.
While a session runs, a BAR / LEAD-ON / REL row appears on the status card. It picks which part of the map you are editing and mirrors the browser editor's tabs — switch in either place.
Two checkboxes next to it preview light suppression: Show exclusion zone outlines the pavement a suppression file will blank under the selected bar; + lead-on rails adds the corridors of that bar's lead-on rows.
The editor can also ask XPGuard for your scenery's airport file, so it draws your add-on's real layout instead of the default airport diagram. The file is sent once, only for this session, and only when the editor asks — the app reads nothing off your disk otherwise.
While mapping, nudge a bar's shape with global hotkeys that work while the MSFS window has focus:
| Key | Action |
|---|---|
Ctrl + Shift + ↑ ↓ ← → |
Move the selected node 0.5 m. Up/Down along the runway, Left/Right along the bar. |
Ctrl + Shift + N |
Jump to the next node. |
Ctrl + Shift + E |
Edit the exclusion zone. Arrows then grow the edge they point at 0.5 m; add Alt to shrink; press Ctrl + Shift + E again when done. |
With the app window focused, plain arrow keys nudge and Tab cycles nodes.
More tips:
- Click a bar in the app's Stopbars list to zoom the editor to it.
- Click a bar in the editor to teleport ~15 m in front of it, facing it.
- Add or remove whole bars in the browser.
For the full walkthrough, see Contributing.