Pilots — X-Plane 12
XPGuard is a small X-Plane 12 plugin. It draws VATSIM-controlled lights in your sim:
- Stop bars
- Lead-on lights
- Takeoff Hold Lights (THL)
- Runway Entrance Lights (REL)
- Follow the Greens taxi guidance
You never switch the lights yourself — controllers do. You read them. Everything runs from one in-sim panel.
The one gate to remember
Lights only appear when both are true:
- You are connected to VATSIM with your pilot client (xPilot, swift or XSquawkBox).
- You are below 1,000 ft AGL.
Above that, the plugin idles and shows nothing.
Installation
- Download the XPGuard Launcher from the xpguard.net homepage — no account needed.
-
Run it and point it at your X-Plane 12 folder. Click
Install— the launcher fetches the plugin and keeps it updated.macOS: the launcher can be blocked
After downloading, run this once:
chmod +x XPGuardLauncher && xattr -d com.apple.quarantine XPGuardLauncher -
Start X-Plane from the launcher (
Launch X-Plane) — see below for what that does. - Open
Plugins → XPGuard → Show control panelto confirm it loaded (figure below).
Start X-Plane from the launcher
Suppress scenery lights is on by default (recommended). The pass runs before
the sim starts — X-Plane started outside the launcher loads the scenery's own
lights, and they light beside XPGuard's until the next launcher start.

The launcher window
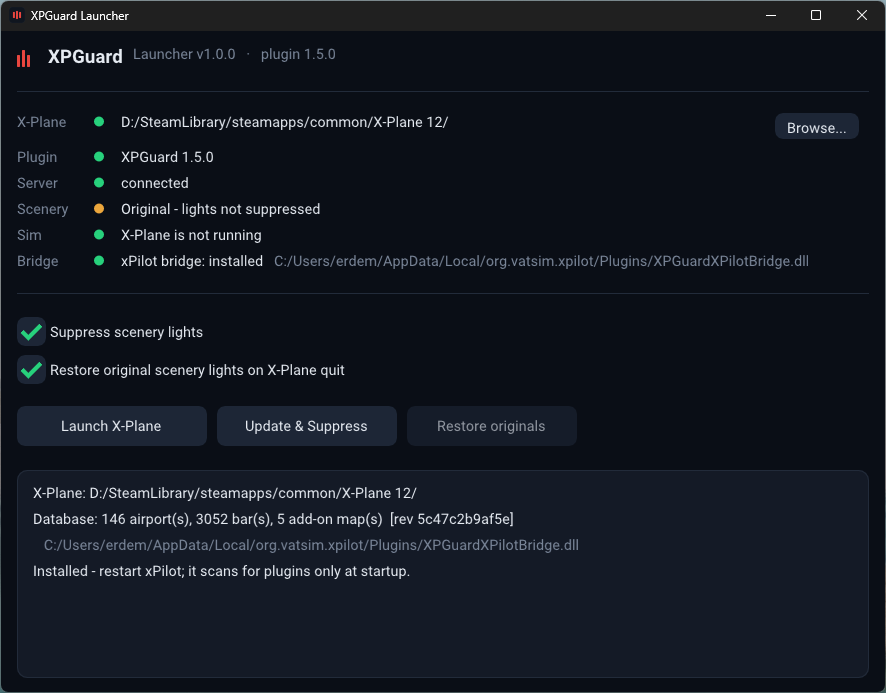
Why it matters. Add-on airports paint their own hold-short and centerline lights, and
those are always on. Left alone they burn beside XPGuard's, so every bar looks lit and a
cleared bar never looks cleared. The launcher removes them from a copy of the scenery's
apt.dat before the sim starts — the originals are never rewritten, and Restore originals
puts everything back.
Settings
Suppress scenery lights— on by default. Off, the scenery's own lights stay on beside XPGuard's.Restore original scenery lights on X-Plane quit— hands the scenery back when you stop flying.
Buttons
Launch X-Plane— runs the pass, then starts the sim. The normal way in.Update & Suppress— runs the pass without starting the sim.Restore originals— undoes it.
The line above the buttons says where you stand: Original - lights not suppressed, or
XPGuard modified - lights suppressed (N airports in M file(s)). The version row below the
folder does the same for the plugin — Install / Update fetches the latest, and the
launcher updates itself the same way.
Bind a key to the panel
You can show/hide the panel from a key:
- Open
Settings → Keyboard. - Search XPGuard.
- Bind
XPGuard/toggle_panel.
Manual install (no launcher)
The plugin also ships as a plain zip on the same page. Without the launcher there is no scenery-light pass (the scenery's own lights stay on beside XPGuard's) and updates are by hand.
- Download the zip.
-
Unzip it into your plugins folder so the layout looks like this:
<X-Plane 12>/Resources/plugins/XPGuard/ win_x64/XPGuard.xpl mac_x64/XPGuard.xpl lin_x64/XPGuard.xpl resources/ stopbar_body.obj stopbar_light.obj node_arrow_small.obj node_arrow_big.obj fixture.png fixture_lit.png node_arrow.png node_arrow_LIT.png xpilot-bridge/XPGuardXPilotBridge.dll version.txtversion.txtis the installed version — the launcher reads it, leave it in place.macOS: the plugin can be blocked
After unzipping, run this once:
xattr -dr com.apple.quarantine "/Applications/X-Plane 12/Resources/plugins/XPGuard" -
Start X-Plane 12.
A few notes on the files:
- All three platform folders ship in the download.
- Leave them in place — X-Plane loads the one for your OS.
- The
node_arrowfiles are the blue node markers used in contribution mode.
Files the plugin writes on first run
A few files appear in resources/ after the first launch. They are not in the download:
stopbar_light_day/dusk/night.obj— the red glow at your brightness settings.rel_light_day/dusk/night.obj— the same red, in REL's narrower beam.ftg_green_day/dusk/night.obj— the same for the green FTG lights.ftg_cover.obj— a flat dark strip laid over the scenery's own centerline lights to hide them.lead_amber_day/dusk/night.obj— amber fallback for lead-on lines.stopbar_body_hidden.obj— the empty housing used byHide light fixtures.publishers.json— your remembered publisher picks.settings.json— every panel setting. To start over: close X-Plane and delete it.
The control panel & settings
Everything lives in the control panel (figure below).
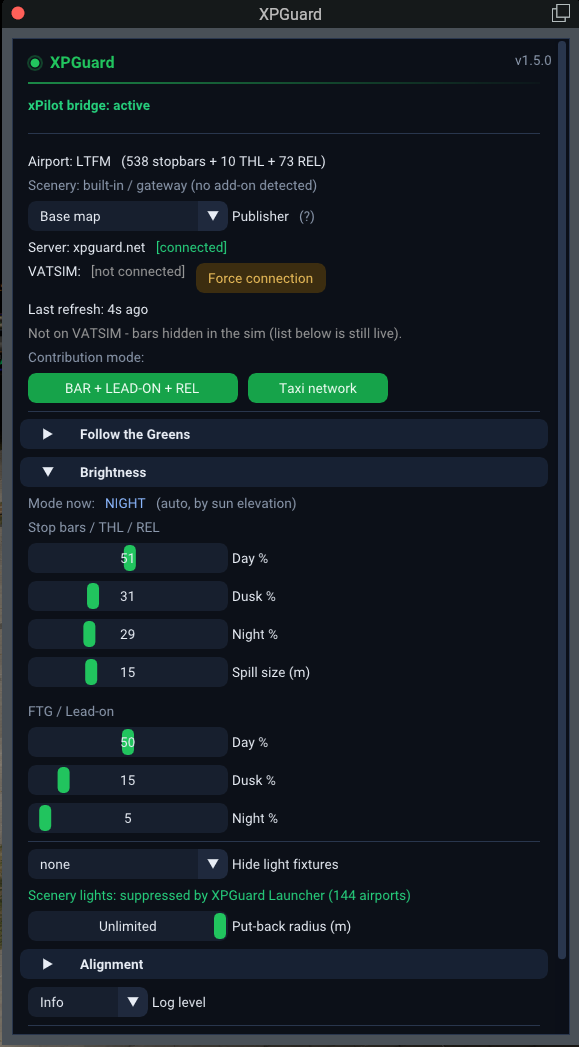
Status block
The top of the panel tells you what is happening right now (figure below):
- The airport and its light counts —
Airport: LTFM (12 stopbars + 2 THL + 3 REL). Server:andVATSIM:connection state.Controlled by …— who is running the position (or Lights are not controlled (OFF) if nobody is). While a controller is online, aDay mode/Dusk mode/Night modeline names the live brightness band.- If a new version is out, an
Update availableline appears with aGet launcherbutton. The launcher installs the update. - On Windows, with xPilot running, an xPilot-bridge status row sits at the very top — see the xPilot bridge.
The live list of red bars sits at the bottom of the panel, above the Reload button: Lit (RED) stop bars: N / M. It stays live even while you are not on VATSIM.
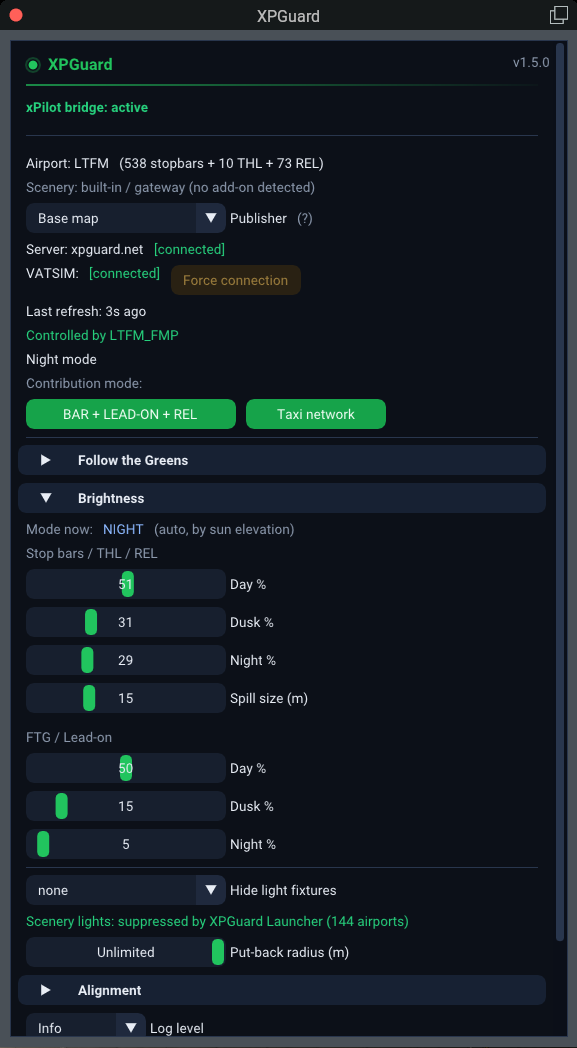
When you are above 1,000 ft, the panel shows Standby mode (Altitude > 1000 ft AGL). That explains why nothing is syncing.
Publisher
The Publisher dropdown picks which scenery's stop-bar map you get here. It is auto-selected from your detected scenery. Override it only if it reads wrong. See Scenery & publisher.
Brightness
Found under the Brightness section. A Mode now: readout shows which of DAY / DUSK / NIGHT is live. This is chosen automatically by sun elevation.
Two labeled groups, split by color exactly as in MSFS:
Stop bars / THL / REL — the reds share the glow:
| Setting | What it does | Default |
|---|---|---|
Day % |
Red glow strength in daytime | 10 |
Dusk % |
Red glow strength at dawn/dusk | 20 |
Night % |
Red glow strength at night | 10 |
Spill size (m) |
Pool of light each fixture casts on the pavement, in the beam direction | 15 |
FTG / Lead-on — the greens, with their own triple:
| Setting | What it does | Default |
|---|---|---|
Day % |
Green light strength in daytime | 10 |
Dusk % |
Green light strength at dawn/dusk | 20 |
Night % |
Green light strength at night | 10 |
Below both, Hide light fixtures picks which families skip their dark housings — see below.
Lead-on green lines are one exception: they use X-Plane's own taxiway light objects, so the sliders do not apply to them — the amber lights across ILS critical areas do follow the FTG / Lead-on group.
Hide light fixtures (new)
Hide light fixtures is a multi-select. Tick any of Stop bars, THL and REL.
- A hidden family stops drawing its dark in-pavement housings.
- So only the lit lights appear when a controller switches them on.
- Pick per family. The preview line reads
none,all, or the list you chose. - Contribution mode always shows the housings — they are the draft preview.
Scenery lights and the put-back
Below the sliders, a read-out reports the scenery's own lights:
Scenery lights: suppressed by XPGuard Launcher (N airports)— the launcher stripped the scenery's own lights under XPGuard's bars and lead-on lines before X-Plane started.Scenery lights: untouched — run XPGuard Launcher to suppress them— nothing stripped yet. Suppression lives in the launcher (Suppress scenery lights, on by default — recommended) and only works when X-Plane is started from it.
While nobody controls a bar, the plugin puts the sim's own lights back. An uncontrolled field never looks darker than stock. Two controls tune that:
Put-back radius (m)— how far from the aircraft the put-back is laid. It follows you as you taxi. Default:Unlimited— the whole field, paced over a few seconds.
Log level
Log level — Info (default) or Debug.
- Written to X-Plane's
Log.txt. - Tagged with UTC time.
- Every XPGuard line is prefixed
XPGuard:.
Alignment
Alignment → Height offset (m) lifts or sinks every XPGuard light at the airport (±5 m, 0.05 m steps).
- For sceneries whose mesh puts the lights under or above the pavement.
- Yours alone — never published, never shared.
- Saved with your settings.
Height only
There is no horizontal offset. If the bars sit in the wrong place, fix the map itself in contribution mode. (REL rows are positioned in the map too.)
Reload
At the very bottom is Reload (re-detect airport + light objects).
- It re-detects the nearest airport and reloads the light objects. No restart.
- Use it if you changed airport and the bars did not follow.
Force connection
Next to the VATSIM: line is an amber Force connection button.
- Use it only if you are online on VATSIM but the plugin cannot read your pilot client.
- Switched on, the row reads
[forced]and the lights appear — stop bars, THL, REL and lead-on. - FTG is the exception: forced mode cannot receive your own FTG guidance (that needs a detected pilot client). You still see other traffic's green routes.
- It is disabled while a connection is detected, and cleared automatically when a real one arrives.
How the lights appear
Once you are online and below 1,000 ft AGL:
| Light | Looks like | Meaning | Driven by |
|---|---|---|---|
| Stop bar | Red lights across a taxiway at a holding position | Red = hold short · Dark = no restriction | A controller switches each bar |
| Lead-on | A green centerline from a stop bar onto the runway | Green = you are cleared past the bar — follow the line | The controller who clears you across |
| THL | A double row of red lights down the runway centerline ahead | Red = do not begin the roll · Dark = runway ahead clear | Automatic, from the controller's ground radar |
| REL | A red row from a holding position to the runway edge | Red = do not enter/cross · Dark = nothing coming | Automatic, per entrance |
Stop bars, THL and REL have no green state. Dark is the "no restriction seen" state. Green belongs to lead-on and FTG lights only.
Lead-on lights
Lead-on lights are a green taxiway centerline running from a stop bar onto the runway. When the controller clears you across, the bar goes dark and the lead-on line lights up. Follow it.
- Where the line crosses an ILS critical area, the lights alternate green and amber.
- With no controller online, the line burns as ordinary taxiway centerline lighting. Nobody is switching it.
- The outbound half — the line vacating traffic follows off the runway — always burns. A stop bar forbids entry, never exit.
- The lights are X-Plane's own centerline light objects, so they look stock. The brightness sliders do not affect them.
- No dark housings by day: an unlit centerline light is a flush lens you do not notice.
Dark is never a clearance
A dark stop bar, dark THL or dark REL is not permission to cross, take off, or enter. A lit green lead-on line is not a clearance by itself either — with no controller online it burns as plain taxiway lighting.
- The lights are an aid. Your clearance always comes verbally from ATC.
- With no controller online — or nobody with THL/REL claimed — no red shows at all. That is not an all-clear.
Two things must be true before THL and REL show:
- A controller must have armed/claimed them for your runway.
- The airport must have published geometry for the scenery you fly.
See the full Lights reference for how much of a THL array lights and what triggers each REL row.
Further reading — RWSL in the real world
XPGuard's THL and REL follow the Runway Status Lights (RWSL) system. RWSL is an ICAO-recognised runway-safety concept operated in the real world by EUROCONTROL and the FAA:
Follow the Greens (FTG)
Follow the Greens is a trail of green taxiway centerline lights (figure below). A controller switches them on to lead you along your cleared route. You taxi by following the greens.
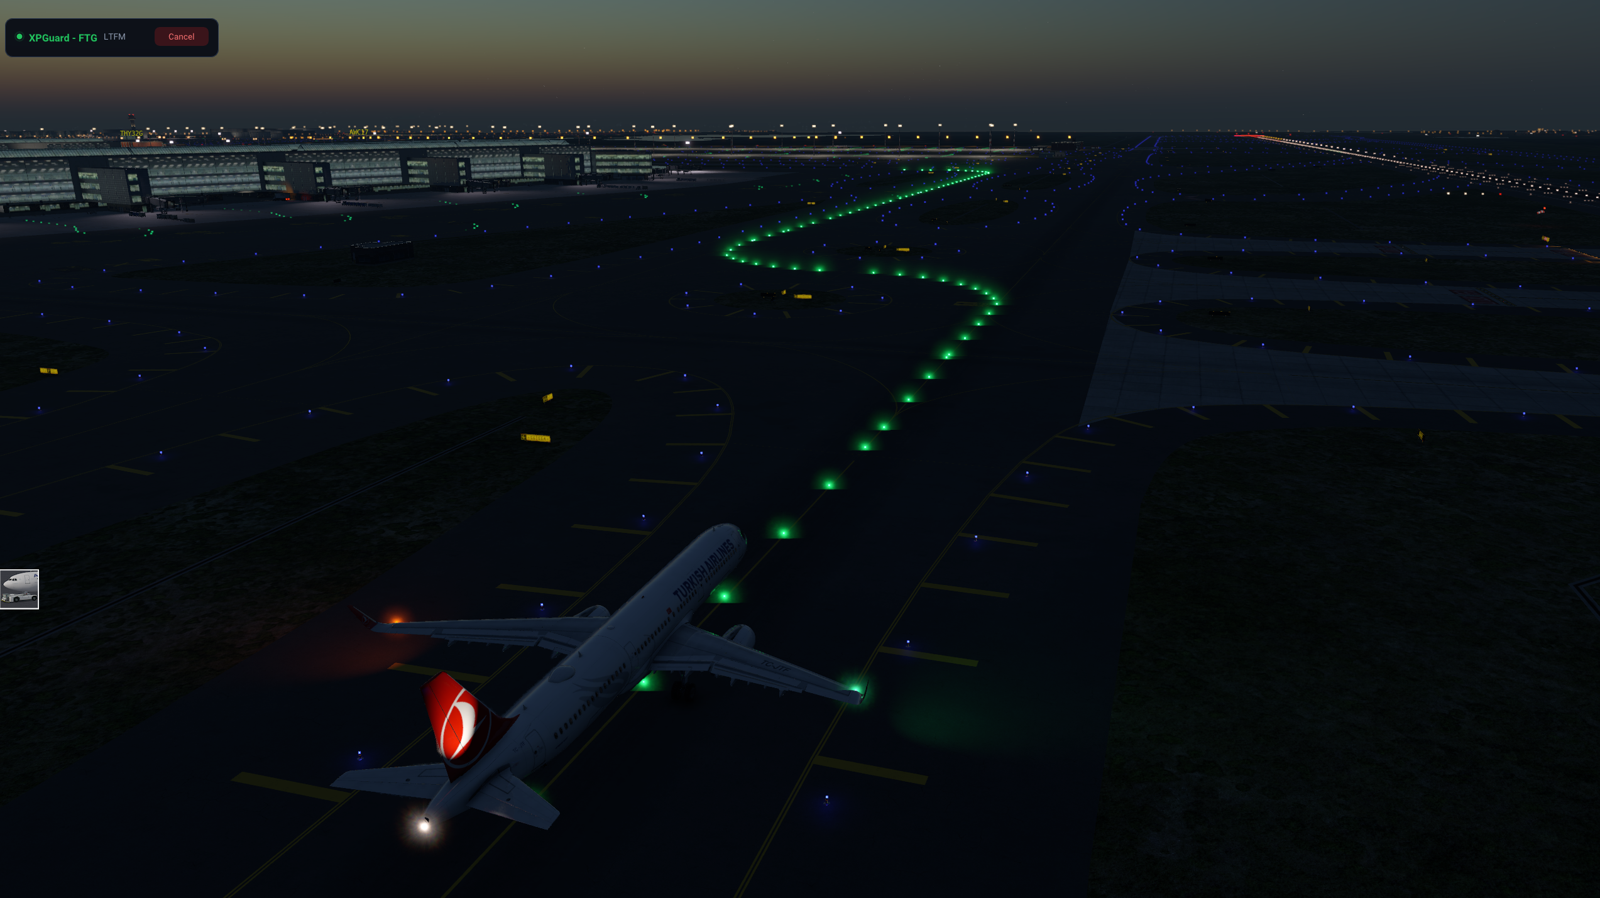
- Controller-driven and VATSIM-only — you never start it yourself.
- Needs a published taxi network, so it is not available at every airport yet.
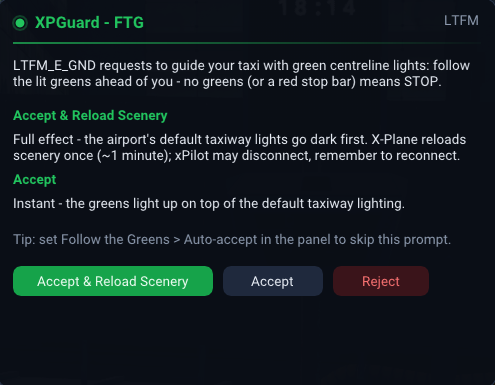
- A controller starts FTG for your callsign. A request popup names them (figure below).
Answering a request
The popup offers up to three choices:
- Accept — instant. Greens light on top of the airport's own taxiway lights.
- Accept & Reload Scenery — the clean look. The airport's own taxi lights go dark and X-Plane reloads once (~1 min), so only the greens show.
- Reject — decline the request.
The popup also carries the Auto-accept dropdown from the panel. Changing it applies from the next request — you still answer this one.
Greens then light along your route. You may get:
- The whole route at once, or
- Segments switched on ahead of you as you taxi.
The controller decides which. A dark centerline or a red stop bar means stop. The greens never light past a red bar.
Scenery already suppressed
If this airport's taxi lights are already suppressed — by an earlier FTG reload, or by the XPGuard Launcher — the popup says the airport is FTG-ready and offers only Accept / Reject.
The reload choice returns after you revert the scenery, or after the scenery updates.
Auto-accept
In the panel's Follow the Greens section, Auto-accept skips the popup. It is one global choice, remembered between sessions:
| Option | Behavior |
|---|---|
Off (ask me) |
Prompt every time |
Accept |
Instant, on top of the existing taxi lighting |
Accept & Reload Scenery |
Darkens the airport's lights, costing one reload the first time at each airport |
While a session is active
- An
FTG ACTIVEcard sits top-left (figure below). Cancel from there, or from the panel'sFollow the Greenssection, at any time. - Tick
Do not show the FTG card (cancel from here)to hide the card. Cancelling then lives in the panel. Hide other traffic's FTG greenskeeps only your own greens on screen.- If you accepted with Accept & Reload Scenery, you are prompted to
Reload Scenerywhen the controller ends the session. That restores the original scenery. - Whenever the airport stays suppressed and no session is running, the panel offers
Restore original lighting. You do not have to catch the end-of-session prompt. The reload takes about a minute. (A field suppressed by the launcher is restored from the launcher.)

Green brightness is separate
The greens dim independently of the stop bars — the FTG / Lead-on sliders under Brightness.
The xPilot bridge — reconnecting after a reload
A scenery reload can drop your VATSIM session. With the bridge, XPGuard puts it back for you.
Install it from the top row of the XPGuard panel. The row reports its state:
- not installed — click
Install xPilot bridge. - an older copy is installed — click
Update the bridge. - installed — restart xPilot to load it — xPilot only scans at startup; close and reopen it.
- active — loaded and watching. Nothing to do.
More about how it behaves:
- The row appears on Windows only, and only while xPilot is running.
- If the bridge is missing or an older copy, the panel opens once per session to say so. Installing it after the reload that needed it does not recover that session.
- When a reload does cost the connection, XPGuard watches for a few seconds, then gives the bridge the go-ahead. The bridge reconnects the exact session that dropped — same callsign, type and SELCAL.
- The popup tells you either way — whether the bridge is handling it or you must reconnect yourself.
- To turn it off: set
"ftg_auto_reconnect": falseinsettings.json.
Getting bars to show — a checklist
- Check your scenery. Open the panel. Is the detected scenery the one you are flying, and did
Publishermatch it? If not, pick the right one (see below). - Connect to VATSIM with your pilot client — xPilot, swift or XSquawkBox. Bars only appear while you are online. If your client is not detected, use Force connection.
- Descend below 1,000 ft AGL. Above that the plugin idles and shows nothing.
- Look for a controller. With one online, bars light when the controller switches them. Without one you get dark fixtures only.
Scenery & publisher
Add-on sceneries paint their markings in slightly different spots than the built-in airport. So XPGuard keeps a separate stop-bar map per scenery. The plugin reads your Custom Scenery list to spot an add-on and shows it in the panel.
Maps are named by sim and publisher:
- Base map — built from X-Plane Gateway data. Every airport has one.
- X-Plane · <publisher> and MSFS · <creator> — add-on maps.
- MSFS · Stock — the built-in MSFS airport.
Which map you get
- Controllers always work the Base map.
- Pilots get the scenery-specific map for what they are flying — or the Base map if none exists for their add-on.
The Publisher dropdown sets which map you get. You normally never touch it:
- XPGuard matches your scenery folder's brand against the airport's published publishers and auto-selects (an
Aerosoft - LFMN…folder reads as Aerosoft). - If the auto-pick is wrong, or your folder is named unusually, pick the right one from the list.
- Your choice is remembered per scenery folder — a one-time fix.
- The list only offers publishers already published here. To add a new one, enter contribution mode and type it in the web editor.
Until an add-on has its own map, you get the Base map. So bars may sit slightly off the add-on's markings. That is exactly what a contribution fixes.
Map an airport
If a bar sits wrong, click Stop bar + REL under Contribution mode:. It opens the browser editor and mirrors your edits live in the sim, so you can align against the real 3D world.
Working in the editor:
- A blue arrow marks every bar node. Click a bar to select it; its selected node grows into a bigger arrow.
- Arrow keys nudge the selected node
0.5 m(Up/Down along the runway, Left/Right along the bar).Tabsteps to the next node. All RED/All OFFflash the lights so you can confirm the bars sit right.- Click
Submitin the browser when done. Contribution mode ends and the plugin returns to the live map.
Adding or removing whole bars is done in the browser; the sim is for fine-positioning. See the contribution guide for the full walkthrough.
Position the REL row
The same session authors REL rows. The panel and the browser share a BAR | REL tab switch — change it in either, both follow.
On the REL tab the node arrows give way to two tools:
- Ground ruler — arrow markers every 5 m along your heading, with a big arrow at the cursor point. Line it up along the hold line to measure and aim.
- Edit camera — a free camera over the pavement.
WASD/arrows move,Q/Erotate,R/Fchange height.Shift= 3× speed,Ctrl= 0.3×. ACamera speed (m/s)slider sets the pace, and you can assign joystick axes to fly it.Escexits.
To lay a line along a taxiway, record a Trace:
- Click
Trace: start recording— or bindXPGuard/ftg_trace_toggleto a key. - Move along the taxiway from the hold line to the runway, with the edit camera or the aircraft.
- Click again to cut. Then fit the trace in the editor's REL tab (
Trace sim).
Taxi network
The second contribution button is Taxi network — the Follow-the-Greens editor. For now it is open only to controller-community moderators with taxi-network editing rights — see Contributing.
See also
- Lights reference — stop bars, lead-on, THL, REL and FTG in full.
- Controllers — EuroScope and vatSys — who drives the lights.
- Contributing — map an airport.
- FAQ.